Tag Archives: UniFi

Install Zerotier One on UniFi Cloud Key

Run the following commands on your UniFi Cloud Key:

NOTE: This guide is outdated. See latest offical support for UniFi devices:

https://docs.zerotier.com/devices/ubiquiti/

curl -s https://install.zerotier.com | bash

Output:

*** ZeroTier One Quick Install for Unix-like Systems

*** Tested distributions and architectures:
***   MacOS (10.7+) on x86_64 (just installs ZeroTier One.pkg)
***   Debian (7+) on x86_64, x86, arm, and arm64
***   RedHat/CentOS (6+) on x86_64 and x86
***   Fedora (16+) on x86_64 and x86
***   SuSE (12+) on x86_64 and x86
***   Mint (18+) on x86_64, x86, arm, and arm64

*** Please report problems to [email protected] and we will try to fix.

*** Detecting Linux Distribution

*** Found Debian "jessie" (or similar), creating /etc/apt/sources.list.d/zerotier.list
OK

*** Installing zerotier-one package...
Hit https://deb.nodesource.com jessie InRelease                                                                                                  
Hit https://deb.nodesource.com jessie/main armhf Packages                                                                                                                                              
Get:1 http://download.zerotier.com jessie InRelease [20.9 kB]                                              
Ign http://httpredir.debian.org jessie InRelease                                                                                
Get:2 http://security.debian.org jessie/updates InRelease [44.9 kB]                                                   
Hit http://www.ubnt.com cloudkey-stable InRelease                                           
Hit http://www.ubnt.com cloudkey-stable/ubiquiti armhf Packages                                                     
Hit http://httpredir.debian.org jessie Release.gpg                                   
Get:3 http://download.zerotier.com jessie/main armhf Packages [2479 B]
Hit http://httpredir.debian.org jessie Release                                          
Hit http://httpredir.debian.org jessie/main armhf Packages                                                                                                                                             
Hit http://httpredir.debian.org jessie/contrib armhf Packages                                                                                                                                          
Hit http://httpredir.debian.org jessie/non-free armhf Packages                                                                                                                                         
Get:4 http://security.debian.org jessie/updates/main armhf Packages [695 kB]                                                                                                                           
Hit http://security.debian.org jessie/updates/contrib armhf Packages                                                                                                                                   
Hit http://security.debian.org jessie/updates/non-free armhf Packages                                                                                                                                  
Fetched 764 kB in 1s (764 KB/s)                                                                                                                                                                  
Reading package lists... Done
Building dependency tree       
Reading state information... Done
The following NEW packages will be installed:
  zerotier-one
0 upgraded, 1 newly installed, 0 to remove and 2 not upgraded.
Need to get 763 kB of archives.
After this operation, 2366 kB of additional disk space will be used.
Get:1 http://download.zerotier.com/debian/jessie/ jessie/main zerotier-one armhf 1.4.6 [763 kB]
Fetched 763 kB in 44s (17.3 kB/s)                                                                                                                                                                      
Selecting previously unselected package zerotier-one.
(Reading database ... 23329 files and directories currently installed.)
Preparing to unpack .../zerotier-one_1.4.6_armhf.deb ...
Unpacking zerotier-one (1.4.6) ...
Processing triggers for systemd (230-7~bpo8+2.ubnt+1) ...
Setting up zerotier-one (1.4.6) ...
Processing triggers for systemd (230-7~bpo8+2.ubnt+1) ...

*** Enabling and starting zerotier-one service...
Synchronizing state of zerotier-one.service with SysV service script with /lib/systemd/systemd-sysv-install.
Executing: /lib/systemd/systemd-sysv-install enable zerotier-one

*** Waiting for identity generation...

*** Success! You are ZeroTier address [ e50a7c7fc2 ].

Run zerotier-cli to see if everything works:

zerotier-cli 
ZeroTier One version 1.4.6 build 0 (platform 1 arch 3)
Copyright (c) 2019 ZeroTier, Inc.
Licensed under the ZeroTier BSL 1.1 (see LICENSE.txt)
Usage: zerotier-cli [-switches] <command/path> [<args>]

Please note after upgrading the Cloud Key firmware, you need to reinstall the Zerotier One package. And if you got the following error when trying to reinstall the package:

*** Enabling and starting zerotier-one service...
Synchronizing state of zerotier-one.service with SysV service script with /lib/systemd/systemd-sysv-install.
Executing: /lib/systemd/systemd-sysv-install enable zerotier-one

*** Waiting for identity generation...

Press control – C and execute the following to restart the service and rejoin the Zerotier network:

systemctl restart zerotier-one
systemctl status zerotier-one
zerotier-cli info
200 info 8ade3af9ef 1.4.6 ONLINE
zerotier-cli join eda9f5dbfe94adbe
200 join OK
# ...then approve it in your Zerotier dashboard
# list network
zerotier-cli listnetworks -j
Ubiquiti UniFi Account/User Credentials Cheatsheet

If your brand-new network is set up by UniFi Network iOS app. and using existing Ubiquiti account [email protected] for sync (the option Enable Local Login with UBNT Account will be enabled automatically if you login your Ubiquiti account during the setup), there’s what you will get:

Newer devices: UDM, UDM-Pro, UDM-SE, Cloud Key G2, etc

  • Web login: UI.com account
  • SSH login:
    • User: ubnt
    • Password: you defined it in system settings on your consoles

Router, Security Gateway aka. USG

  • Web login:
    • User: admin or custom defined
    • Password: Random-generated during your first setup via iOS app. You need to checked “Enable SSH authentication” in order to change your USG username and password at the time of writing (UI version: 5.10.23.0). It can be found in UniFi Controller Web UI (under Settings – Site – Device Authentication, then click the eye-shaped icon to reveal the password)
  • SSH login:
    • User: admin or custom defined
    • Password: same as USG login credentials

Switch, aka. USW

  • SSH login:
    • User: admin
    • Password: same as USG login credentials

UniFi Cloud Key, aka. UCK

  • UniFi Controller Web UI:
  • UniFi Cloud Key Web UI:
  • SSH login:
    • User: root
    • Password: Your UniFi Cloud password

UniFi Cloud Key: MongoDB Out of Memory Issue

You may find the following issue if you run a UniFi setup:

tail -f /srv/unifi/logs/server.log

...
Wed Jun 27 21:52:34.250 [initandlisten] ERROR: mmap private failed with out of memory. You are using a 32-bit build and probably need to upgrade to 64

After googling for it you may find a Ubiquiti staff post a prune script on their forum.

But you may find that script can only be executed while the MongoDB is running. However no one mentioned how to solve it when you can’t start your MongoDB. Here’s the solution, actually you don’t even need to repair your database in this situation:

Make sure unifi service is stopped:

systemctl stop unifi

Download the prune script from Ubiquity support

wget https://ubnt.zendesk.com/hc/article_attachments/115024095828/mongo_prune_js.js

Start a new SSH session, run MongoDB without --journal, all others parameters are copied from the unifi service:

mongod --dbpath /usr/lib/unifi/data/db --port 27117 --unixSocketPrefix /usr/lib/unifi/run --noprealloc --nohttpinterface --smallfiles --bind_ip 127.0.0.1

Run the prune script:

mongo --port 27117 < mongo_prune_js.js

You should get the similar output:

MongoDB shell version: 2.4.10
connecting to: 127.0.0.1:27117/test
[dryrun] pruning data older than 7 days (1541581969480)... 
switched to db ace
[dryrun] pruning 12404 entries (total 12404) from alarm... 
[dryrun] pruning 16036 entries (total 16127) from event... 
[dryrun] pruning 76 entries (total 77) from guest... 
[dryrun] pruning 24941 entries (total 25070) from rogue... 
[dryrun] pruning 365 entries (total 379) from user... 
[dryrun] pruning 0 entries (total 10) from voucher... 
switched to db ace_stat
[dryrun] pruning 0 entries (total 313) from stat_5minutes... 
[dryrun] pruning 21717 entries (total 22058) from stat_archive... 
[dryrun] pruning 715 entries (total 736) from stat_daily... 
[dryrun] pruning 3655 entries (total 5681) from stat_dpi... 
[dryrun] pruning 15583 entries (total 16050) from stat_hourly... 
[dryrun] pruning 372 entries (total 382) from stat_life... 
[dryrun] pruning 0 entries (total 0) from stat_minute... 
[dryrun] pruning 56 entries (total 56) from stat_monthly... 
bye

Then edit the prune script and rerun the prune script with dryrun=false:

MongoDB shell version: 2.4.10
connecting to: 127.0.0.1:27117/test
pruning data older than 7 days (1541582296632)... 
switched to db ace
pruning 12404 entries (total 12404) from alarm... 
pruning 16036 entries (total 16127) from event... 
pruning 76 entries (total 77) from guest... 
pruning 24941 entries (total 25070) from rogue... 
pruning 365 entries (total 379) from user... 
pruning 0 entries (total 10) from voucher... 
{ "ok" : 1 }
{ "ok" : 1 }
switched to db ace_stat
pruning 0 entries (total 313) from stat_5minutes... 
pruning 21717 entries (total 22058) from stat_archive... 
pruning 715 entries (total 736) from stat_daily... 
pruning 3655 entries (total 5681) from stat_dpi... 
pruning 15583 entries (total 16050) from stat_hourly... 
pruning 372 entries (total 382) from stat_life... 
pruning 0 entries (total 0) from stat_minute... 
pruning 56 entries (total 56) from stat_monthly... 
{ "ok" : 1 }
{ "ok" : 1 }
bye

Start the unifi service

systemctl start unifi

The root cause of this issue is that Cloud Key is currently running on ARMv7, a 32-bit based custom Debian system. so MongoDB cannot handle data larger than 2 GB. I haven’t tried the Cloud Key 2 and 2 Plus I hope they’re ARMv8 based. At the moment you can limit data retention as a workaround.

UniFi Security Gateway (USG) Decrypt Error (Inform Error, aka “Adopting” Loop) for v4.4.28 Firmware

This is a known issue (bug) with USG 4.4.28.* firmware confirmed on official beta forum, the error would be like:

Sep 26 22:38:55 main-router mcad:  ace_reporter.process_inform_response(): Failed to get the decrypted data from custom alert response#012
Sep 26 22:38:55 main-router mcad:  ace_reporter.reporter_fail(): Decrypt Error (http://192.168.1.10:8080/inform)
Sep 26 22:39:10 main-router mcad:  mcagent_data.data_decrypt(): header too small. size=0, should be=40
Sep 26 22:39:10 main-router mcad:  ace_reporter.process_inform_response(): Failed to get the decrypted data from custom alert response#012
Sep 26 22:39:10 main-router mcad:  ace_reporter.reporter_fail(): Decrypt Error (http://192.168.1.10:8080/inform)
Sep 26 22:54:31 main-router mcad:  mcagent_data.data_decrypt(): header too small. size=0, should be=40
Sep 26 22:54:31 main-router mcad:  ace_reporter.process_inform_response(): Failed to get the decrypted data from custom alert response#012

Solutions (try them in the following order):

  • Disable period speed test
  • Reboot the controller
  • Force provision the USG
  • Try official unifi-util patch
  • Reset USG and readopt it
  • Upgrade/downgrade to a previously working version

Mine got everything back to work after resetting the USG.

Some tips:

You can run info to get some basic info what’s going on with your USG:

user@main-router:~$ info

Model:       UniFi-Gateway-4
Version:     4.4.29.5124212
MAC Address: 78:8a:20:7c:ba:1d
IP Address:  11.22.33.44
Hostname:    main-router
Uptime:      192 seconds

Status:      Connected (http://unifi:8080/inform)

HTTPS on UniFi Cloud Key, with Remote Access Support, the Easy Way

You can try this method if you meet one of the following situation:

Requirements

  • A public IP to the internet (to access Unifi Security Gateway remotely)
  • A server running Nginx on public internet
  • A CA issued certificate

Set port forwarding for your Cloud Key

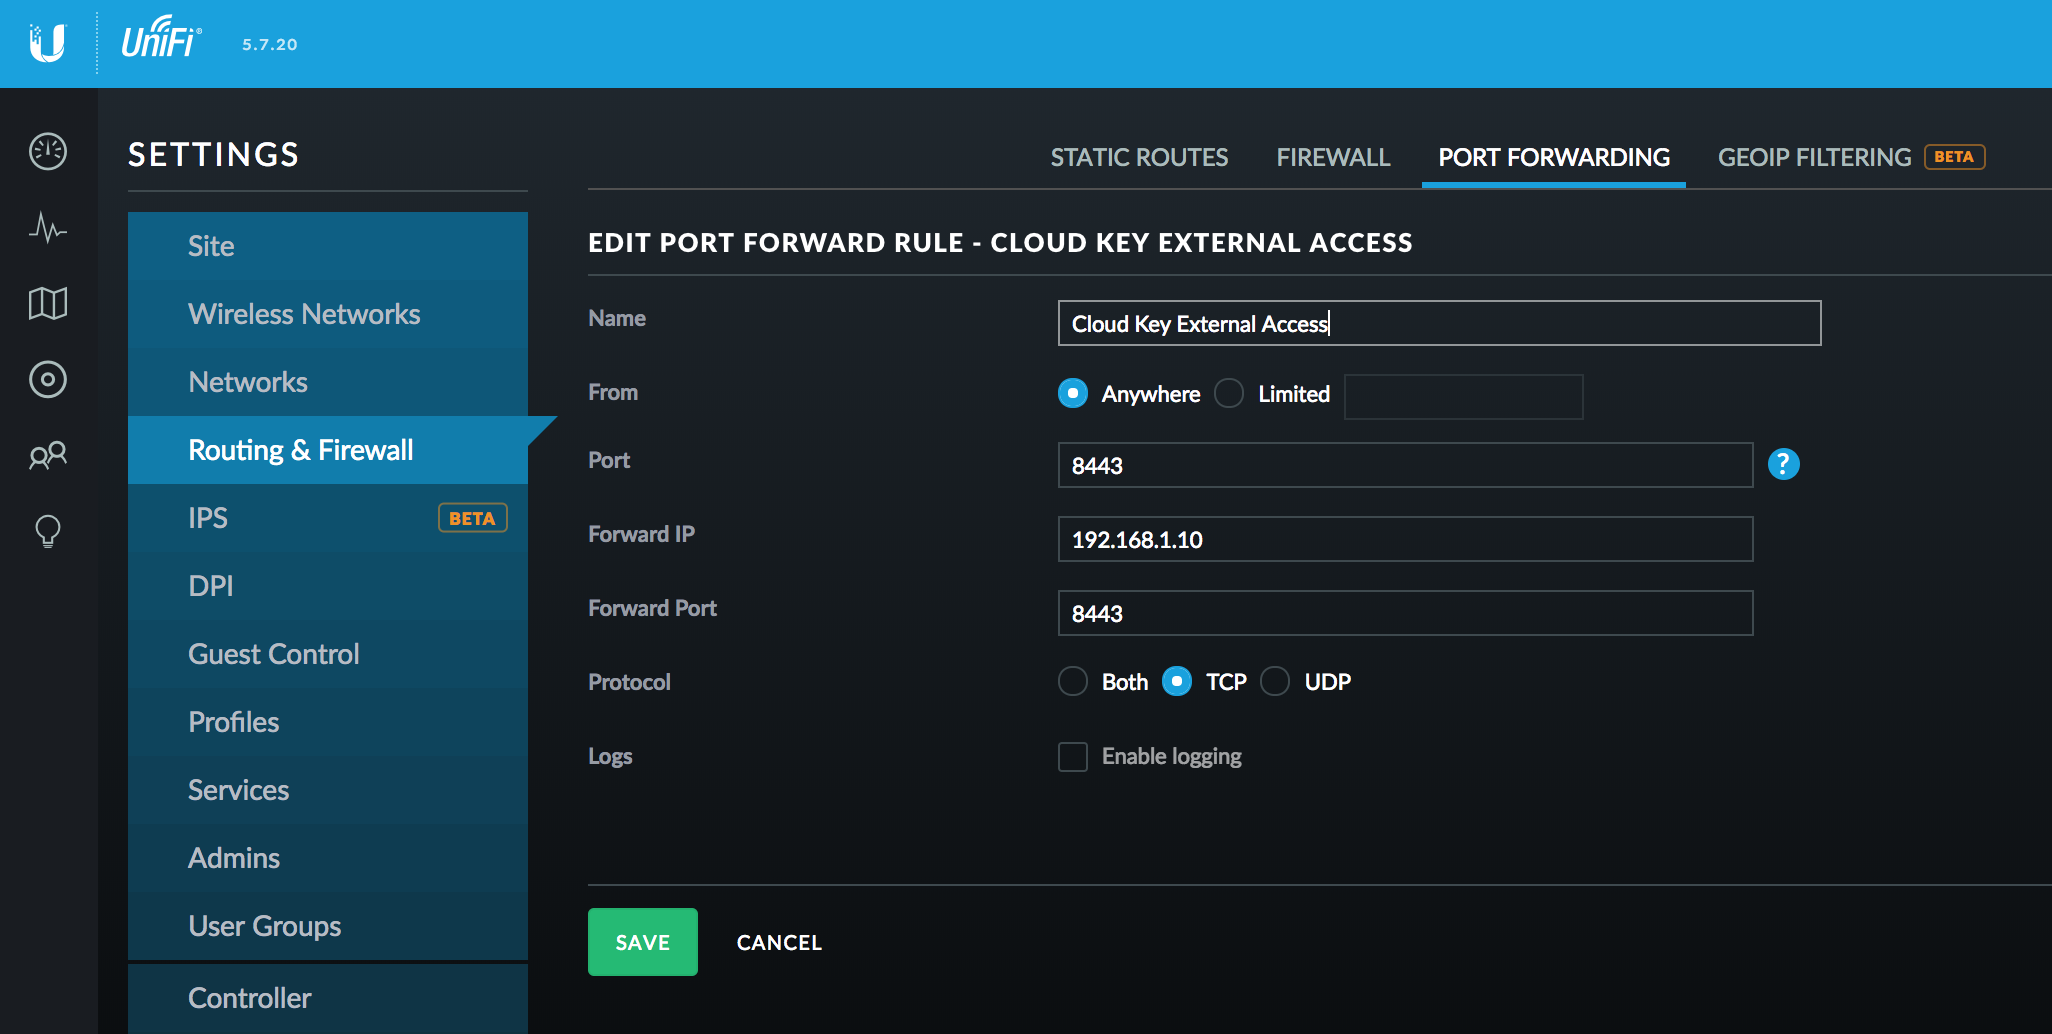
In general, you can access your Unifi Secuiry Gateway (USG) via your public IP (USG_IP), so in my method you need to forward your UCK management dashboard (UCK_IP:8443 by default) traffic to your public IP. it’s under Settings – Routing & Firewall – Port Forwarding. Enter your Cloud Key address IP as Forward IP, use default 8443 as Port and Forward Port. You can also limit from destination to your server IP for security best practice.

Setup Nginx proxy

Use the following Nginx configuration, please note that this is a simplified version.

server {
  listen                  80;
  listen                  [::]:80;

  server_name             unifi.example.com;

  return                  301 https://$server_name$request_uri;
}

server {
  listen                  443       ssl http2;
  listen                  [::]:443  ssl http2;

  # To avoid unreachable port error when launching dashboard from unifi.ubnt.com
  listen                  8443       ssl http2;
  listen                  [::]:8443  ssl http2;

  server_name             unifi.example.com;

  # Certificate
  ssl_certificate         /etc/nginx/ssl/unifi.example.com.crt;
  ssl_certificate_key     /etc/nginx/ssl/unifi.example.com.key;

  location /wss {
    proxy_http_version 1.1;
    proxy_set_header Upgrade $http_upgrade;
    proxy_set_header Connection "Upgrade";
    proxy_set_header CLIENT_IP $remote_addr;
    proxy_set_header X-Forwarded-For $proxy_add_x_forwarded_for;
    proxy_read_timeout 86400;
    proxy_pass https://USG_IP:8443;
  }

  location / {
    proxy_set_header Host $http_host;
    proxy_set_header CLIENT_IP $remote_addr;
    proxy_set_header X-Forwarded-For $proxy_add_x_forwarded_for;
    proxy_read_timeout 180;
    proxy_pass https://USG_IP:8443;
  }
}

Update DNS records

Point your unifi.example.com to your public IP. Access it in your browser and everything now should works!

References

UniFi – Cloud Key Emergency Recovery UI – Ubiquiti Networks Support and Help Center

This article describes how to access the emergency recovery UI and recover a Cloud Key. From this UI you can reset it to factory defaults, reboot, shutoff and upgrade the firmware. To upgrade the firmware you will need a firmware binary for the UniFi Cloud Key.

Source: UniFi – Cloud Key Emergency Recovery UI – Ubiquiti Networks Support and Help Center