The following script will print true if the given quest is done.
/script print(IsQuestFlaggedCompleted(12345))
Main blog category, I’m too lazy to manage multiple categories so this blog has only one category.
The following script will print true if the given quest is done.
/script print(IsQuestFlaggedCompleted(12345))
Actually this macro will dismiss logout timer when you’re AFK.
/script T,F=T or 0,F or CreateFrame("frame")if X then X=nil else X=function()local t=GetTime()if t-T>1 then StaticPopup1Button1:Click()T=t end end end F:SetScript("OnUpdate",X)
Sometimes the UI is bugged that your finished achievements are still tracked and there’s no way to untrack them, run the following command to untrack them:
/script RemoveTrackedAchievement(GetTrackedAchievements())
The above command remove the first tracking achievement in your tracking list.
See original post
/console UnitNamePlayerGuild 0
From ECMAScript regular expressions are getting better!:
Lookarounds are zero-width assertions that match a string without consuming anything. ECMAScript currently supports lookahead assertions that do this in forward direction. Positive lookahead ensures a pattern is followed by another pattern:
const pattern = /\d+(?= dollars)/u;
const result = pattern.exec('42 dollars');
// → result[0] === '42'
Negative lookahead ensures a pattern is not followed by another pattern:
const pattern = /\d+(?! dollars)/u;
const result = pattern.exec('42 pesos');
// → result[0] === '42'
A proposal adds support for lookbehind assertions. Positive lookbehind ensures a pattern is preceded by another pattern:
const pattern = /(?<=\$)\d+/u;
const result = pattern.exec('$42');
// → result[0] === '42'
Negative lookbehind ensures a pattern is not preceded by another pattern:
const pattern = /(?<!\$)\d+/u;
const result = pattern.exec('€42');
// → result[0] === '42'
In /etc/modprobe.d/disable_ipv6.conf:
alias net-pf-10 off
#alias ipv6 off
options ipv6 disable=0
In /etc/sysctl.conf:
net.ipv6.conf.all.disable_ipv6=0
net.ipv6.conf.default.disable_ipv6=0
net.ipv6.conf.lo.disable_ipv6=0
Then run sysctl -p to take effect.
Then in Example Configurations under HE.net Tunnel Details page, in the dropdown menu select Linux-route2, copy all the commands and paste into your server:
modprobe ipv6
ip tunnel add he-ipv6 mode sit remote 1.2.3.4 local 5.6.7.8 ttl 255
ip link set he-ipv6 up
ip addr add 2001:470:18:d18::2/64 dev he-ipv6
ip route add ::/0 dev he-ipv6
ip -f inet6 addr
Test the tunnel:
ping6 irc6.oftc.net
Google Groups allows you to create and participate in online forums and email-based groups with a rich experience for community conversations.
Source: Is it possible to add another domain, not a domain alias ? – Google Product Forums
这大概就是成长环境对一个人的影响的最好的正面例子了

The Apple co-founder spent his own money, and more importantly, lots of his own time, showing us public school kids how to use the early internet.
Source: Steve Wozniak Was My Computer Teacher in 1995 | Motherboard
Mozilla 教你如何成为 CA
The Franchise Tax for a Delaware limited liability company (LLC) or Delaware limited partnership (LP) is a flat annual rate of $300 as of July 1, 2014.
The Franchise Tax for a corporation is a little more complicated. It is based on your corporation type and the number of authorized shares your company has. The total cost of the Franchise Tax is comprised of an annual report fee and the actual tax due.
A non-stock/non-profit company is considered exempt with the state of Delaware. This type of company does not pay the annual tax but must file and pay the annual report fee. The annual report fee is $25 per year.
A corporation having 5,000 authorized shares or less is considered a minimum stock corporation. The annual report fee is $50 and the tax is $175 as of July 1, 2014, for a total of $225 per year.
A corporation having 5,001 authorized shares or more is considered a maximum stock corporation. The annual report fee is $50 and the tax would be somewhere between $200 and $180,000 per year.
There are two methods to calculate a maximum stock company’s Franchise Tax. They are:
The state of Delaware uses this method to initially calculate your taxes. This method is calculated based on the number of authorized shares. The calculation is as follows:
For Example
Don’t forget to add the $50 annual report fee to the Franchise Tax after it is calculated.
To use this method, you must give figures for all issued shares (including treasury shares) and total gross assets in the spaces provided in your Annual Franchise Tax Report. Total Gross Assets shall be those “total assets” reported on the U.S. Form 1120, Schedule L (Federal Return) relative to the company’s fiscal year ending the calendar year of the report. The tax rate under this method is $350.00 per million or portion of a million. If the assumed par value capital is less than $1,000,000, the tax is calculated by dividing the assumed par value capital by $1,000,000 then multiplying that result by $350.00.
The example cited below is for a corporation having 1,000,000 shares of stock with a par value of $1.00 and 250,000 shares of stock with a par value of $5.00 , gross assets of $1,000,000.00 and issued shares totaling 485,000.
NOTE: If an amendment changing your stock or par value was filed with the Division of Corporations during the year, issued shares and total gross assets within 30 days of the amendment must be given for each portion of the year during which each distinct authorized amount of capital stock or par value was in effect. The tax is then prorated for each portion of the year dividing the number of days the stock/par value was in effect by 365 days (366 leap year), then multiplying this result by the tax calculated for that portion of the year. The total tax for the year is the sum of all the prorated taxes for each portion of the year.
aws s3 ls --summarize --human-readable --recursive s3://bucket-name/
See more at AWS docs
It’s ridiculous you can’t uninstall those fucking stupid apps from where they’re installed. Windows Store app is really poorly designed.
If you like me owning more than one Mac and using one of them to control the other via macOS built-in Screen Sharing feature, you may occur this issue after you upgrade your macOS to Sierra.
macOS Sierra introduces a new feature Universal Clipboard which can share the same clipboard among iOS and macOS devices. This sounds cool, but as it’s technically a part of Continuity feature, it would require Bluetooth to work.
So the problem is, when I control my Mac mini from my MacBook Pro via Screen Sharing in the same network, with the Shared Clipboard enabled, the Universal Clipboard would still always try to “sync” copied content via Bluetooth instead of using Screen Sharing Shared Clipboard.
It’s ok if both of your Macs are at your hand, but it’s a disaster if they’re in different rooms, Universal Clipboard via Bluetooth would become really slow to connect to each other, and this issue could even make your VNC drop connection if you copy images to your clipboard.
So here’s the solution, just disable Bluetooth on your Mac mini, and wait Apple to fix this bug.
Hi, I recently upgraded to Windows 10 and when I an downlaoding apps from App store it is throwing Error 0x80070002..
Source: Error Code 0x80070002 while installing apps from Store in Windows 10 – Microsoft Community

Mobile innovation in China is flourishing, bringing new conveniences to daily life. Is that happening despite or because of the country’s strict controls on online expression?
The installation of GitLab in Fedora 19 went fine. I followed the official installation guide with some deviations where necessary, mostly taken from the CentOS guide in gitlab-recipes. I setup nginx using the ssl config, and poked some holes in iptables. For systemd services I used these files.
Source: SELinux policy for nginx and GitLab unix socket in Fedora 19
I do not have a root password for many of the servers I interact with so I can not SSH directly in as the root user. Also, the ssh daemons are wisely configured with ‘PermitRootLogin’ s…
$ sudo /usr/libexec/repair_packages --verify --standard-pkgs /
$ sudo /usr/libexec/repair_packages --repair --standard-pkgs --volume /
Install required packages via Homebrew:
$ brew install gpg gpg-agent pinentry-mac
Edit and add the following lines in ~/.gnupg/gpg-agent.conf:
pinentry-program /usr/local/bin/pinentry-mac
Edit and enable use-agent in ~/.gnupg/gpg.conf:
use-agent
Then add the following line to your shell profile:
eval $(gpg-agent --daemon --sh)
Playbook config:
- name: basic setup
  hosts: default
  user: user
  become: true
  become_user: root
  become_method: sudo
  roles:
    - tasks
If you got the following errors:
GATHERING FACTS ***************************************************************
failed: [server1] => {"failed": true, "parsed": false}
OpenSSH_6.9p1, LibreSSL 2.1.8
debug1: Reading configuration data /Users/user/.ssh/config
debug1: /Users/user/.ssh/config line 139: Applying options for server1
debug1: Reading configuration data /etc/ssh/ssh_config
debug1: /etc/ssh/ssh_config line 21: Applying options for *
debug1: auto-mux: Trying existing master
debug1: mux_client_request_session: master session id: 2
sudo: sorry, you must have a tty to run sudo
Then visudo and disable requiretty:
Defaults !requiretty
List kernels:
$ egrep ^menuentry /etc/grub2.cfg | cut -f 2 -d \'
CentOS Linux (3.10.0-327.10.1.el7.x86_64) 7 (Core)
CentOS Linux (3.10.0-327.4.5.el7.x86_64) 7 (Core)
CentOS Linux (3.10.0-327.3.1.el7.x86_64) 7 (Core)
CentOS Linux (3.10.0-229.20.1.el7.x86_64) 7 (Core)
CentOS Linux (3.10.0-123.9.3.el7.x86_64) 7 (Core)
CentOS Linux, with Linux 0-rescue-45461f76679f48ee96e95da6cc798cc8
Set kernel to the fourth:
$ grub2-set-default 3
After upgrading from MySQL 5.1 to 5.6 , mysql service failed to start.InnoDB: auto-extending data file ./ibdata1 is of a different size 640 pages (rounded down to MB) than specified in the .cnf file: initial 768 pages, max 0 (relevant if non-zero) pages!
Billing screw-up
Hello there,
Thanks for your recent $95 renewal of archiving! I am very grateful for your trust in Pinboard.
However, I made a coding mistake on the new Stripe billing page, and instead of being billed for the correct amount ($95), your card was billed for $0.95.
I’ve refunded this payment, and I’m afraid you’ll have to visit https://pinboard.in/renew at your convenience, and make the charge one more time. I have added three months to your archiving as an apology for my sloppy coding.
Kind wishes,
Maciej
(Pinboard leader)
Apple introduces System Integrity Protection (SIP) as a security feature for OS X El Capitan (10.11), which prevent ProxyChains-NG working as before, you have to disable SIP to make it work:
csrutil enable --without debug:$ csrutil enable --without debug
$ csrutil: requesting an unsupported configuration. This is likely to break in the future and leave your machine in an unknown state.
$ Successfully enabled System Integrity Protection. Please restart the machine for the changes to take effect.
Just ignore the warnings and then restart your Mac.
From Digital Ocean
This is very tricky and you should rerun this command every time you upgrade your node version:
n=$(which node);n=${n%/bin/node}; chmod -R 755 $n/bin/*; sudo cp -r $n/{bin,lib,share} /usr/localBetter solutions are welcome.
是不是我的 shadowsocks 進程死掉了?
是不是我的 shadowsocks 該更新了?
是不是只是端口被封了?
是不是我的 HTTP 代理進程死掉了?
是不是我的 UDP reply 又報錯了?
是不是 DNS 壞了?
是不是 server 本身的問題?
是不是 server 到國內的線路抽風了?
是不是 ISP 自己抽風了?
是不是只有自己的 server 被 GFW 關照了?
是不是 GFW 整體抽風了?
是不是要訪問的網站本身出問題了?
每當一個中國人發現自己要訪問的網站無法訪問時,都要進行上述思考,都要浪費數十分鐘甚至數小時來解決「網站無法訪問」的問題,隨著年齡增大,時間甚是珍貴,每次想想每年為此付出的時間與金錢,終於明白為什麼有那麼多人放棄大陸安逸的生活而跑去水深火熱的美國了。
You can get all proxy bypass domains using:
$ networksetup -getproxybypassdomains "Wi-Fi"
The Wi-Fi should be your current interface, you can also update it using:
$ networksetup -setproxybypassdomains "Wi-Fi" \
*.local \
0.0.0.0/8 \
1.0.0.0/9 \
1.160.0.0/11 \
1.192.0.0/11 \
See man networksetup for more information
We’ve seen recently more and more DOS and DDOS attacks. Some of them were very big, requiring thousands of computers… But in most cases, this kind of attacks are made by a few computers aimin…
What programmers need to know about servers.
Source: Using SSL Certificates with HAProxy – Servers for Hackers
This article explains how to configure NGINX and NGINX Plus to accept the PROXY protocol. Table of Contents Introduction Using the PROXY protocol with SSL, HTTP/2, SPDY, and WebSocket Using the PROXY protocol with a TCP Stream Complete Example Introduction The PROXY protocol enables NGINX and NGINX Plus to receive client connection information passed through […]
Source: Configuring NGINX to accept the PROXY Protocol – NGINX
To assign the eth0 network interface temporarily to the internal zone, type:
$ firewall-cmd --zone=internal --change-interface=eth0
success
To assign the eth0 network interface permanently to the internal zone (a file called internal.xml is created in the /etc/firewalld/zones directory), type:
$ firewall-cmd --permanent --zone=internal --change-interface=eth0
success
Source: RHEL7: How to get started with Firewalld. – CertDepot

Firewalld is a complete firewall solution available by default on CentOS and Fedora servers. In this guide, we will cover how to set up a basic firewall for your server and show you the basics of managing the firewall with firewall-cmd, its command-li
Source: How To Set Up a Firewall Using FirewallD on CentOS 7 | DigitalOcean
If you have the environment variable XDG_DATA_HOME set, the installation is located at $XDG_DATA_HOME/letsencrypt. Otherwise, it is located at ~/.local/share/letsencrypt. You can simply delete this directory. You can also delete configuration, work, and log directories which by default are stored at /etc/letsencrypt, /var/lib/letsencrypt, and /var/log/letsencrypt respectively. The directory where you cloned our git repo can also be deleted.
Let’s Encrypt also installs some OS dependencies and how you remove these would be very OS specific. To see what dependencies were installed, take a look at the files in the bootstrap folder at the root of our git repo (link). Take a look at the shell script for your OS to see what packages are required. You can uninstall these packages through the normal means of your OS, but make sure they aren’t required by any other programs on your system.
Source: Uninstalling letsencrypt – Let’s Encrypt Community Support
Check out the recently released RFC on TCP Fast Open, a spec that allows most TCP connections to send data during the initial SYN packet – reducing the initial round trips required from 2 to 1. Excellent for HTTPS connections.
Source: Shaving your RTT with TCP Fast Open – Bradley Falzon
最近重灌了 El Capitan,在找「三星 850 Pro 是否可以用 trimforce 開啟 Trim 支援」時發現了下面的信息:
我就看了下我的硬體:
Samsung SSD 850 PRO 512GB:

  Capacity: 512.11 GB (512,110,190,592 bytes)
  Model:    Samsung SSD 850 PRO 512GB
  Revision: EXM01B6Q
  Serial Number:    S1SXNSAF806527E
  Native Command Queuing:   Yes
  Queue Depth:  32
  Removable Media:  No
  Detachable Drive: No
  BSD Name: disk0
  Medium Type:  Solid State
  TRIM Support: No
  Bay Name: Lower
  Partition Map Type:   GPT (GUID Partition Table)
  S.M.A.R.T. status:    Verified
😀
# Permanently
$ defaults write com.apple.iTunes AppleLanguages '("ja-JP")'
$ defaults write com.apple.iTunes AppleLanguages '("zh-CN")'
$ defaults write com.apple.Maps AppleLanguages '("zh-CN")'
$ defaults write com.tencent.qq AppleLanguages '("zh-CN")'
$ defaults write com.tencent.xinWeChat AppleLanguages '("zh-CN")'

# Just once
$ /Applications/Maps.app/Contents/MacOS/Maps -AppleLanguages '(zh-TW)'
Update Aug 25, 2016: This may not work for all apps.
If you got the following error in Jenkins output using rsync:
Running "shell:sync" (shell) task
Host key verification failed.
rsync: connection unexpectedly closed (0 bytes received so far) [sender]
rsync error: error in rsync protocol data stream (code 12) at io.c(605) [sender=3.0.9]
Warning: Command failed: Host key verification failed.
rsync: connection unexpectedly closed (0 bytes received so far) [sender]
rsync error: error in rsync protocol data stream (code 12) at io.c(605) [sender=3.0.9]
 Use --force to continue.
Try the following:
su -s /bin/bash jenkins, since Jenkins install doesn’t have login shell by default on CentOSyesCentOS version. You should edit sudoers file:
First add jenkins as sudoer without password:
jenkins ALL= NOPASSWD: ALL
Then disable requiretty:
Defaults !requiretty
Bohemian Coding – Preferences.
Used to tell Sketch to export compact SVG files. We add some metadata to exported SVG files, to make it easier to re-import them in Sketch. However, if you are sure you won’t import them, you can disable the saving of metadata by running this into your Terminal.app:
$ defaults write com.bohemiancoding.sketch3 exportCompactSVG -bool yes
When this is set to YES, Sketch will not use the name of the layer for the id field of the layer in SVG export:
$ defaults write com.bohemiancoding.sketch3 svgExportSkipAssignIdToLayerName -bool yes
The Harvard Crimson | Class of 2018 By the Numbers.
通过图表展现了哈佛大学学生 SAT 分数、家庭平均收入、大学费用的一些数据,非常有趣
其中家庭收入分布中占比最多的在年薪 $125k-$250k:
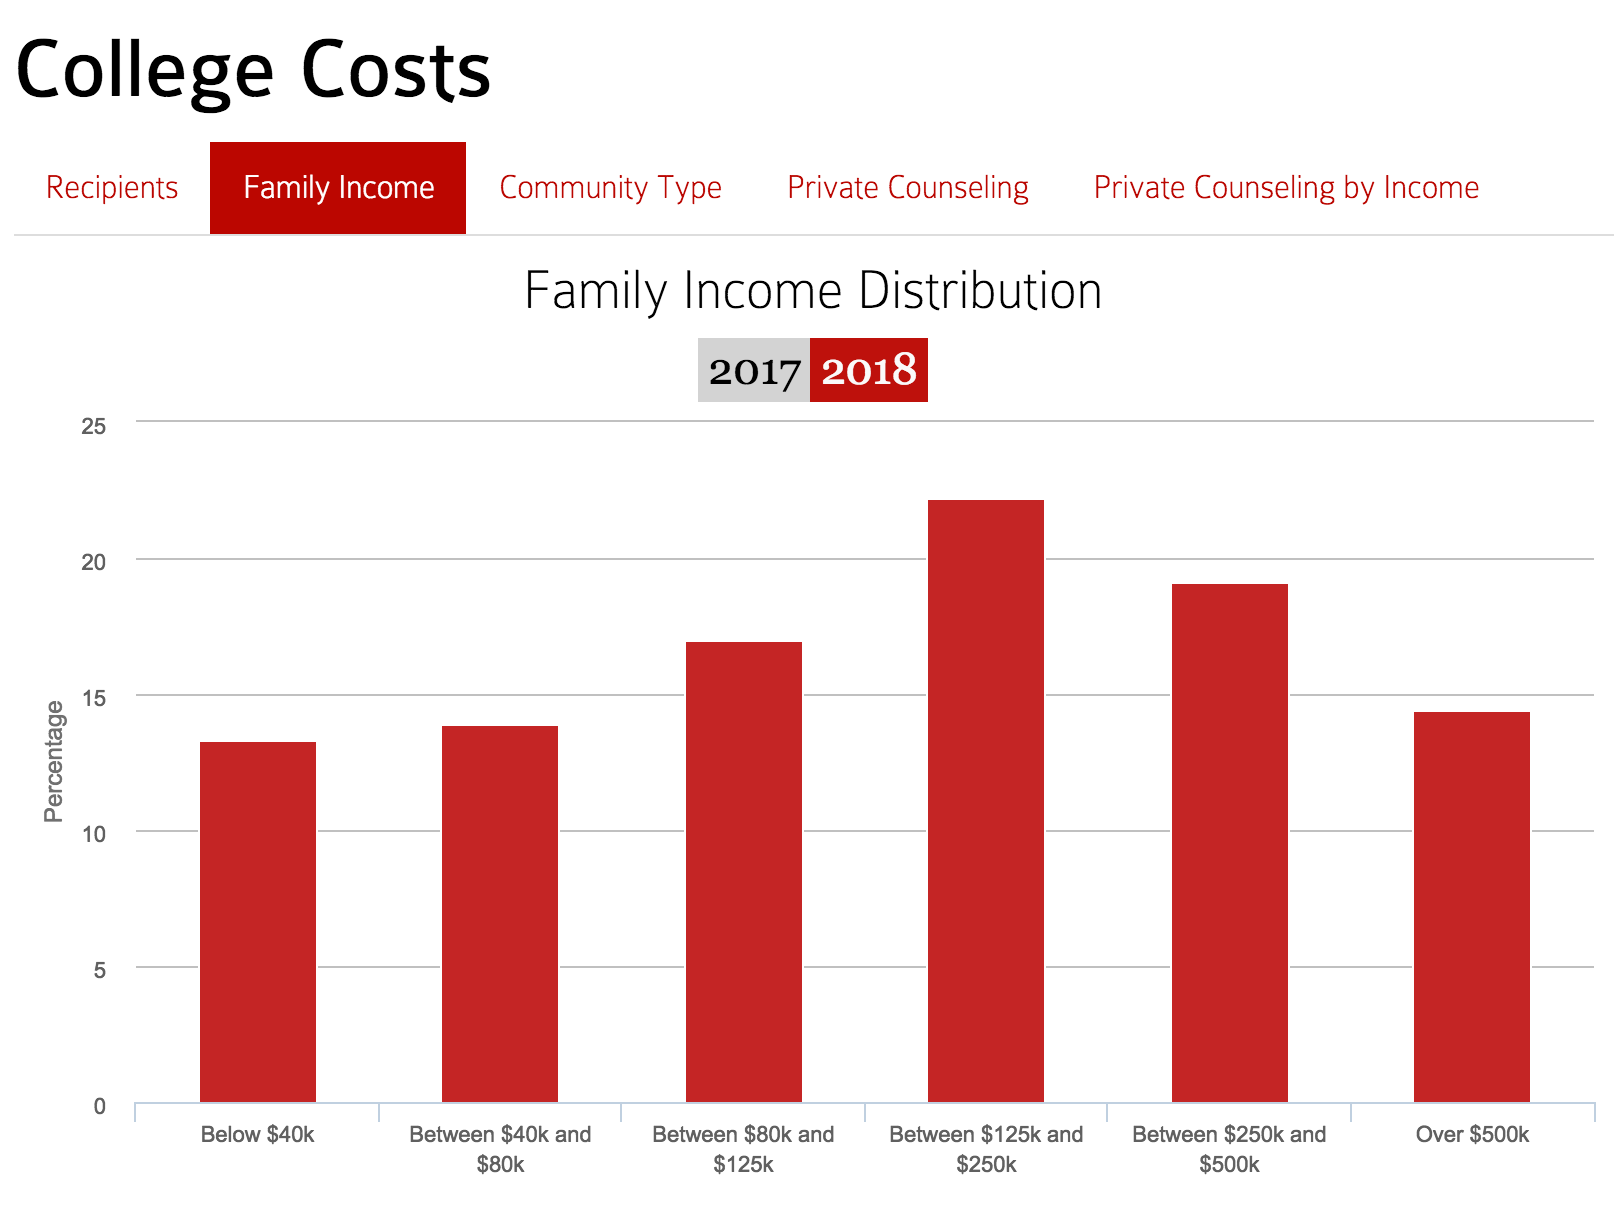
继续搬砖去了
First you need to install gcloud
$ gcloud auth login
$ gcloud auth list
$ gcloud config set project my-project
$ gcloud init my-project
$ gcloud compute ssh my-instance --zone asia-east1-a
$ gcloud compute config-ssh
More info: https://cloud.google.com/compute/docs/gcloud-compute/
I’ve been using Route53 and aws-cli to dynamically update DNS for my home server for a long time. This time I tried Cloudflare with dynamic DNS support.
First install cloudflare-cli:
$ npm install -g cloudflare-cli
Configure your bash script:
#!/bin/bash

# Setup envrionment
export PATH=/usr/local/bin:/usr/local/sbin:$PATH

# First install cloudflare-cli on OS X:
# npm install -g cloudflare-cli

# Add this script to cron, run it every 10 mins:
# */10 * * * * bash ~/Dropbox/Mac/Backups/Scripts/server-update-cloudflare.sh

# Cloudflare API key
TOKEN="your_token_here"

# Cloudflare account
ACCOUNT="[email protected]"

# Domain name
DOMAIN="example.com"

# The record you want to update e.g. hello, use the bare domain if you want to update root (@) record
RECORD="example.com"

# cfcli location
CFCLI=`which cfcli`

# Log file location
LOGFILE="/tmp/update-cloudflare.log"

# Get the external IP address
IP=`dig +short myip.opendns.com @resolver1.opendns.com`
IPOLD=`$CFCLI listrecords | pcregrep -o1 -e '.+?A.+?example\.com.+?([0-9]{1,3}\.[0-9]{1,3}\.[0-9]{1,3}\.[0-9]{1,3}).+'`
IPVPN=`ifconfig | grep -o ppp`
# Valid IP
function valid_ip() {
  local ip=$1
  local stat=1
  if [[ $ip =~ ^[0-9]{1,3}\.[0-9]{1,3}\.[0-9]{1,3}\.[0-9]{1,3}$ ]]; then
    OIFS=$IFS
    IFS='.'
    ip=($ip)
    IFS=$OIFS
    [[ ${ip[0]} -le 255 && ${ip[1]} -le 255 \
      && ${ip[2]} -le 255 && ${ip[3]} -le 255 ]]
    stat=$?
  fi
  return $stat
}
# Compare IPs
if ! valid_ip $IP; then
  echo "[`date`] ERROR: Invalid IP '$IP'" >> "$LOGFILE"
  exit 1
fi
# Check if the IP has changed
if [ "$IP" == "$IPOLD" ] || [[ $IPVPN ]]; then
  echo "[`date`] SAME: $IP $IPVPN" >> "$LOGFILE"
  exit 0
else
  echo "[`date`] UPDATE: $IPOLD >>> $IP" >> "$LOGFILE"
  $CFCLI -k $TOKEN -e $ACCOUNT -d $DOMAIN editrecord $RECORD $IP
fi
Run it with cron:
*/10 * * * * bash ~/Dropbox/Mac/Backups/Scripts/server-update-cloudflare.sh
Try -c copy:
$ ffmpeg -i video.mp4 -c copy audio.aac
How ever you have to know the original audio format to extract audio without re-encoding, for example:
$ ffmpeg -i video.mp4
...
  Metadata:
    major_brand     : isom
    minor_version   : 1
    compatible_brands: isomavc1
    creation_time   : 2015-01-17 20:39:33
  Duration: 00:23:59.94, start: 0.000000, bitrate: 1983 kb/s
    Stream #0:0(und): Video: h264 (High) (avc1 / 0x31637661), yuv420p(tv, bt709), 1280x720 [SAR 1:1 DAR 16:9], 1787 kb/s, 23.98 fps, 23.98 tbr, 24k tbn, 47.95 tbc (default)
    Metadata:
      creation_time   : 2015-01-17 20:39:33
      handler_name    : 264:[email protected]
    Stream #0:1(jpn): Audio: aac (LC) (mp4a / 0x6134706D), 48000 Hz, stereo, fltp, 191 kb/s (default)
    Metadata:
      creation_time   : 2015-01-17 15:55:11
      handler_name    : Sound Media Handler
...
Then you should know what format and which track to extract.
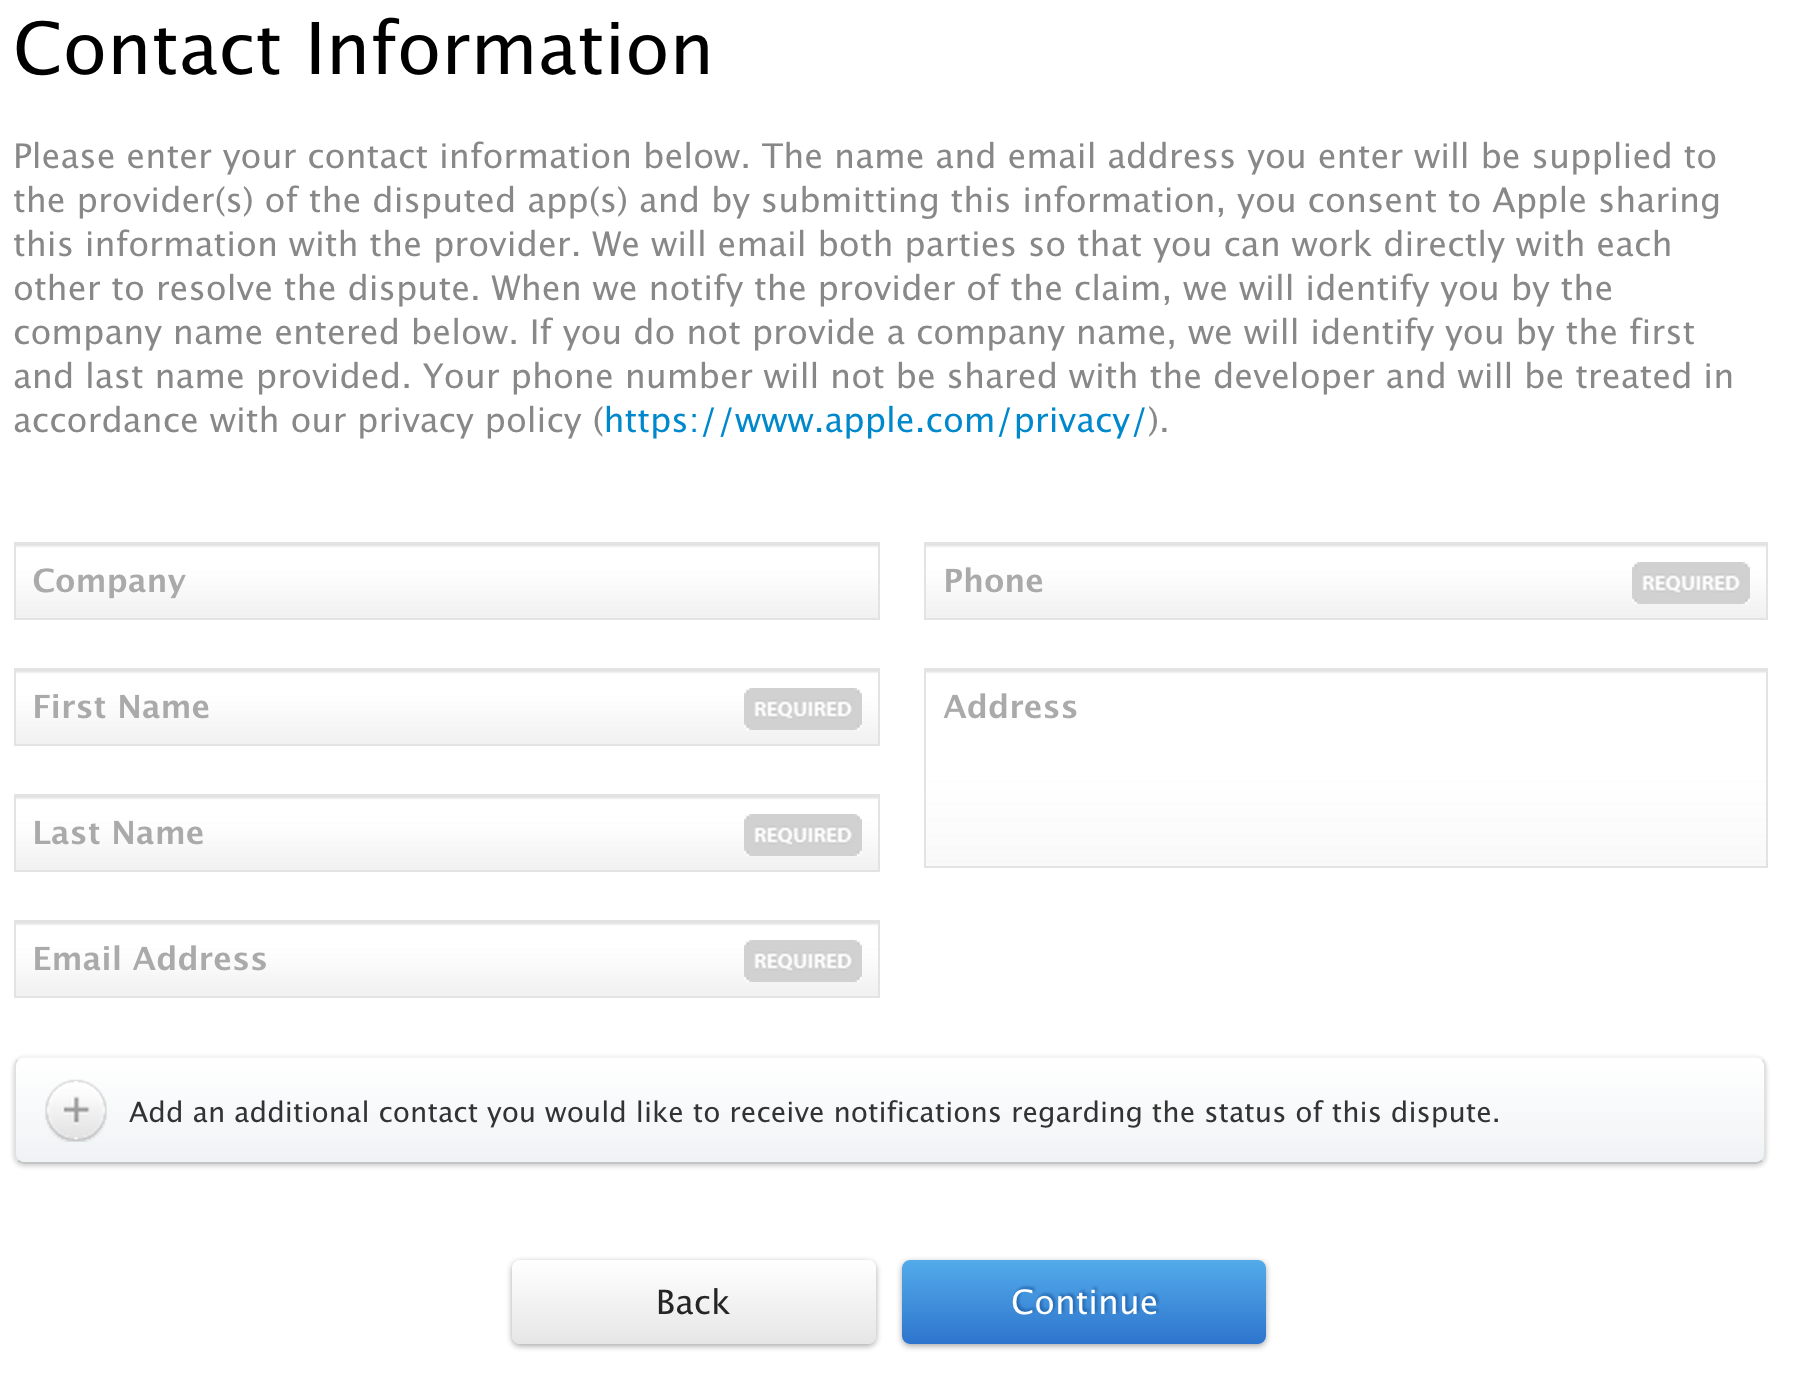
There’re many fake / disputed / copycat apps made by Chinese in iTunes App Store, here’s how to report these shit to Apple:
First, open iTunes Content Dispute to start dispute process. Enter some basic information and continue.
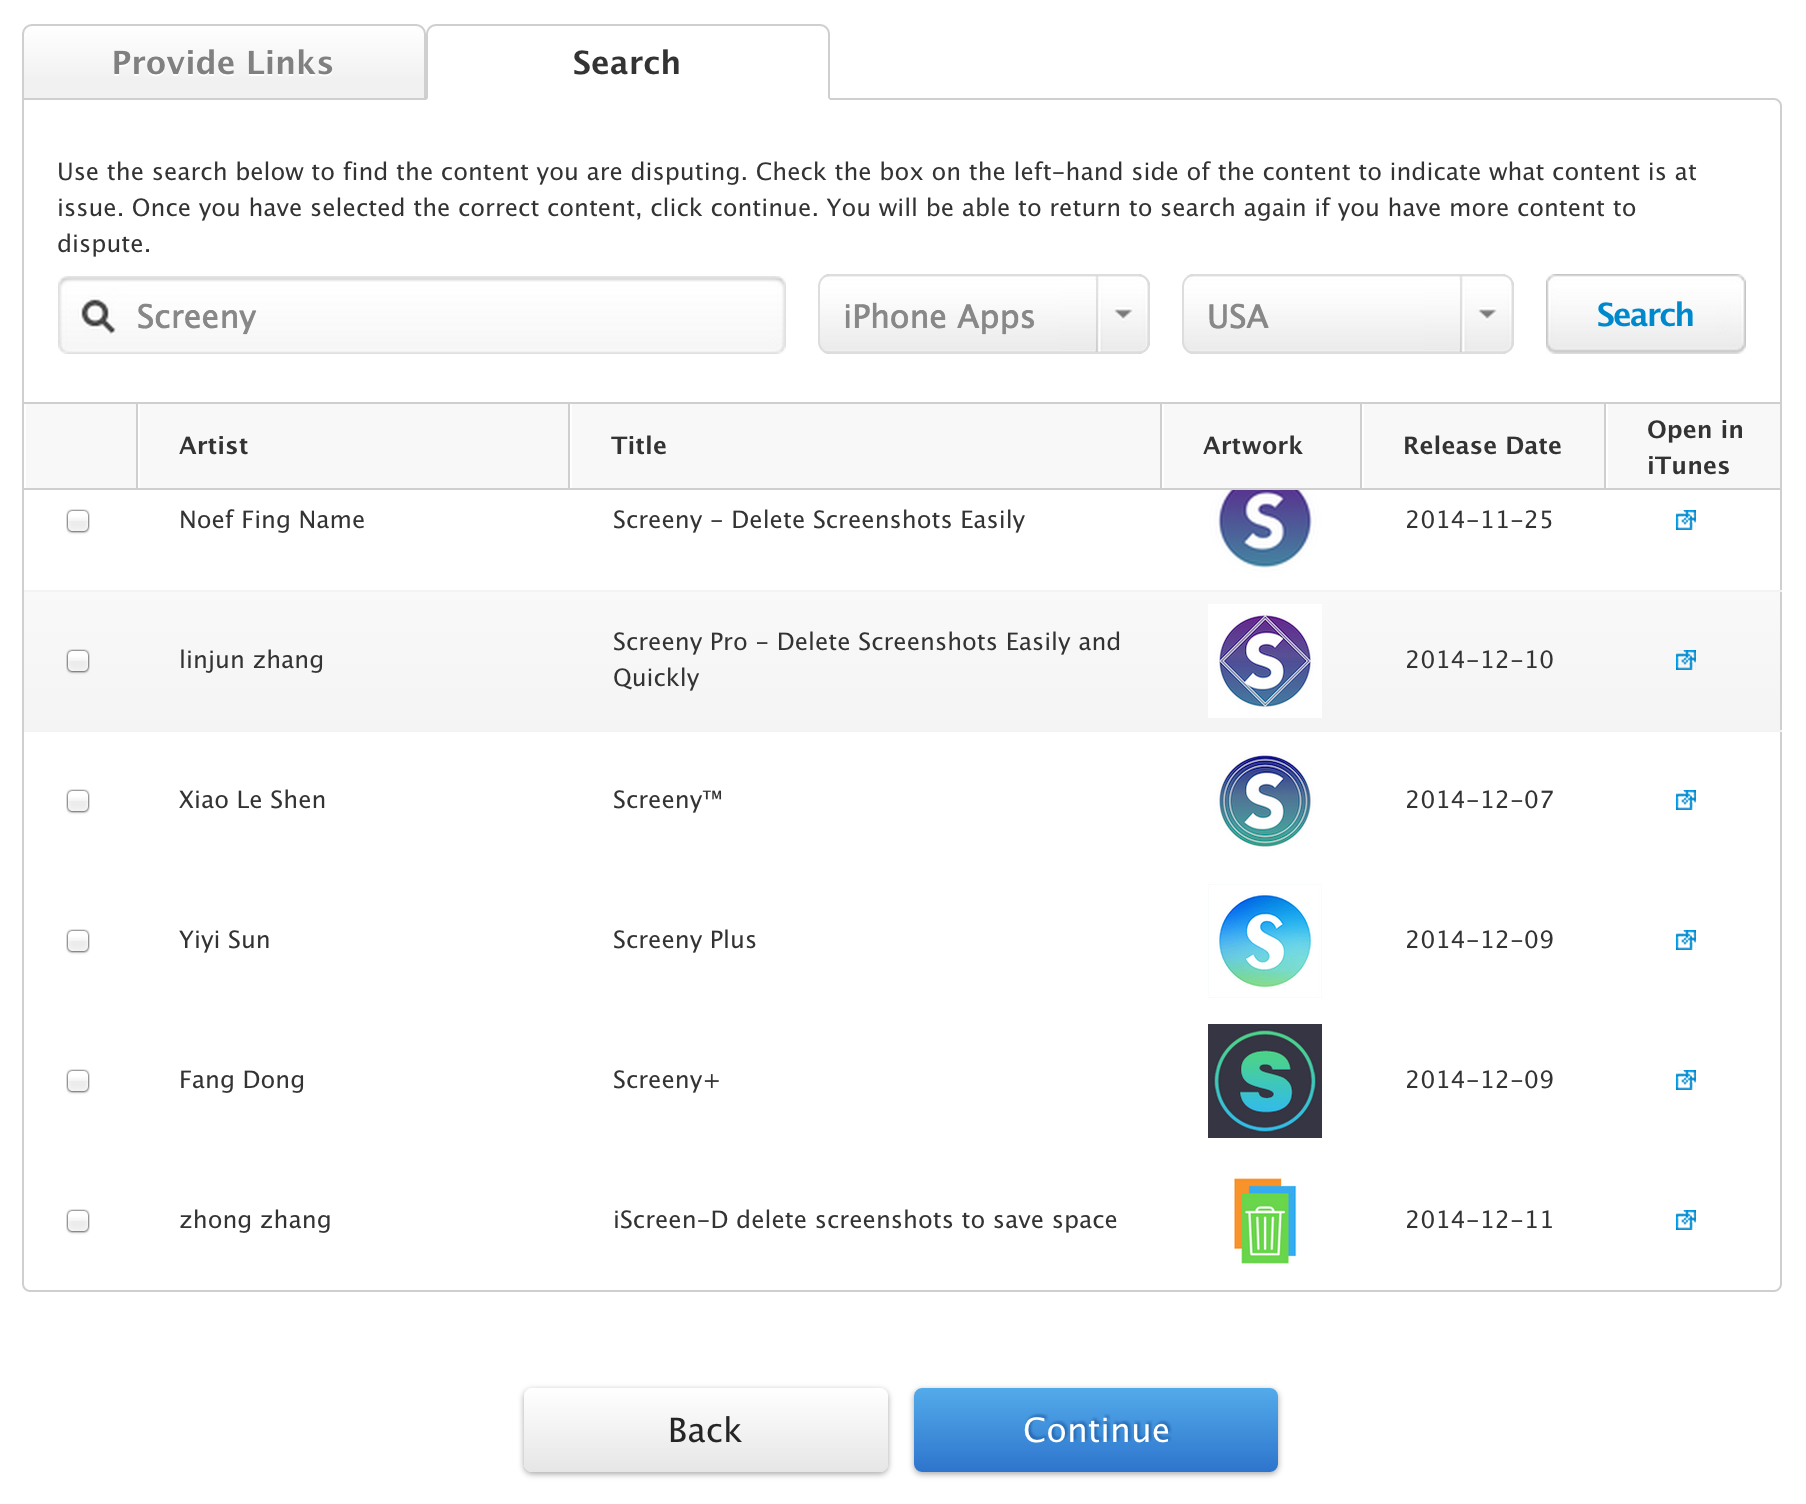
Then you can provide a link to the app from the App Store. Alternatively, you may use the search tab below to search for the app at issue. If there is more than one app you wish to dispute, for example I just searched “Screeny” and got the following result:
Then select them all and continue, you can get a dropdown to choose the nature of your dispute, and a text box for every app you can write details information about your dispute, here’s an example:
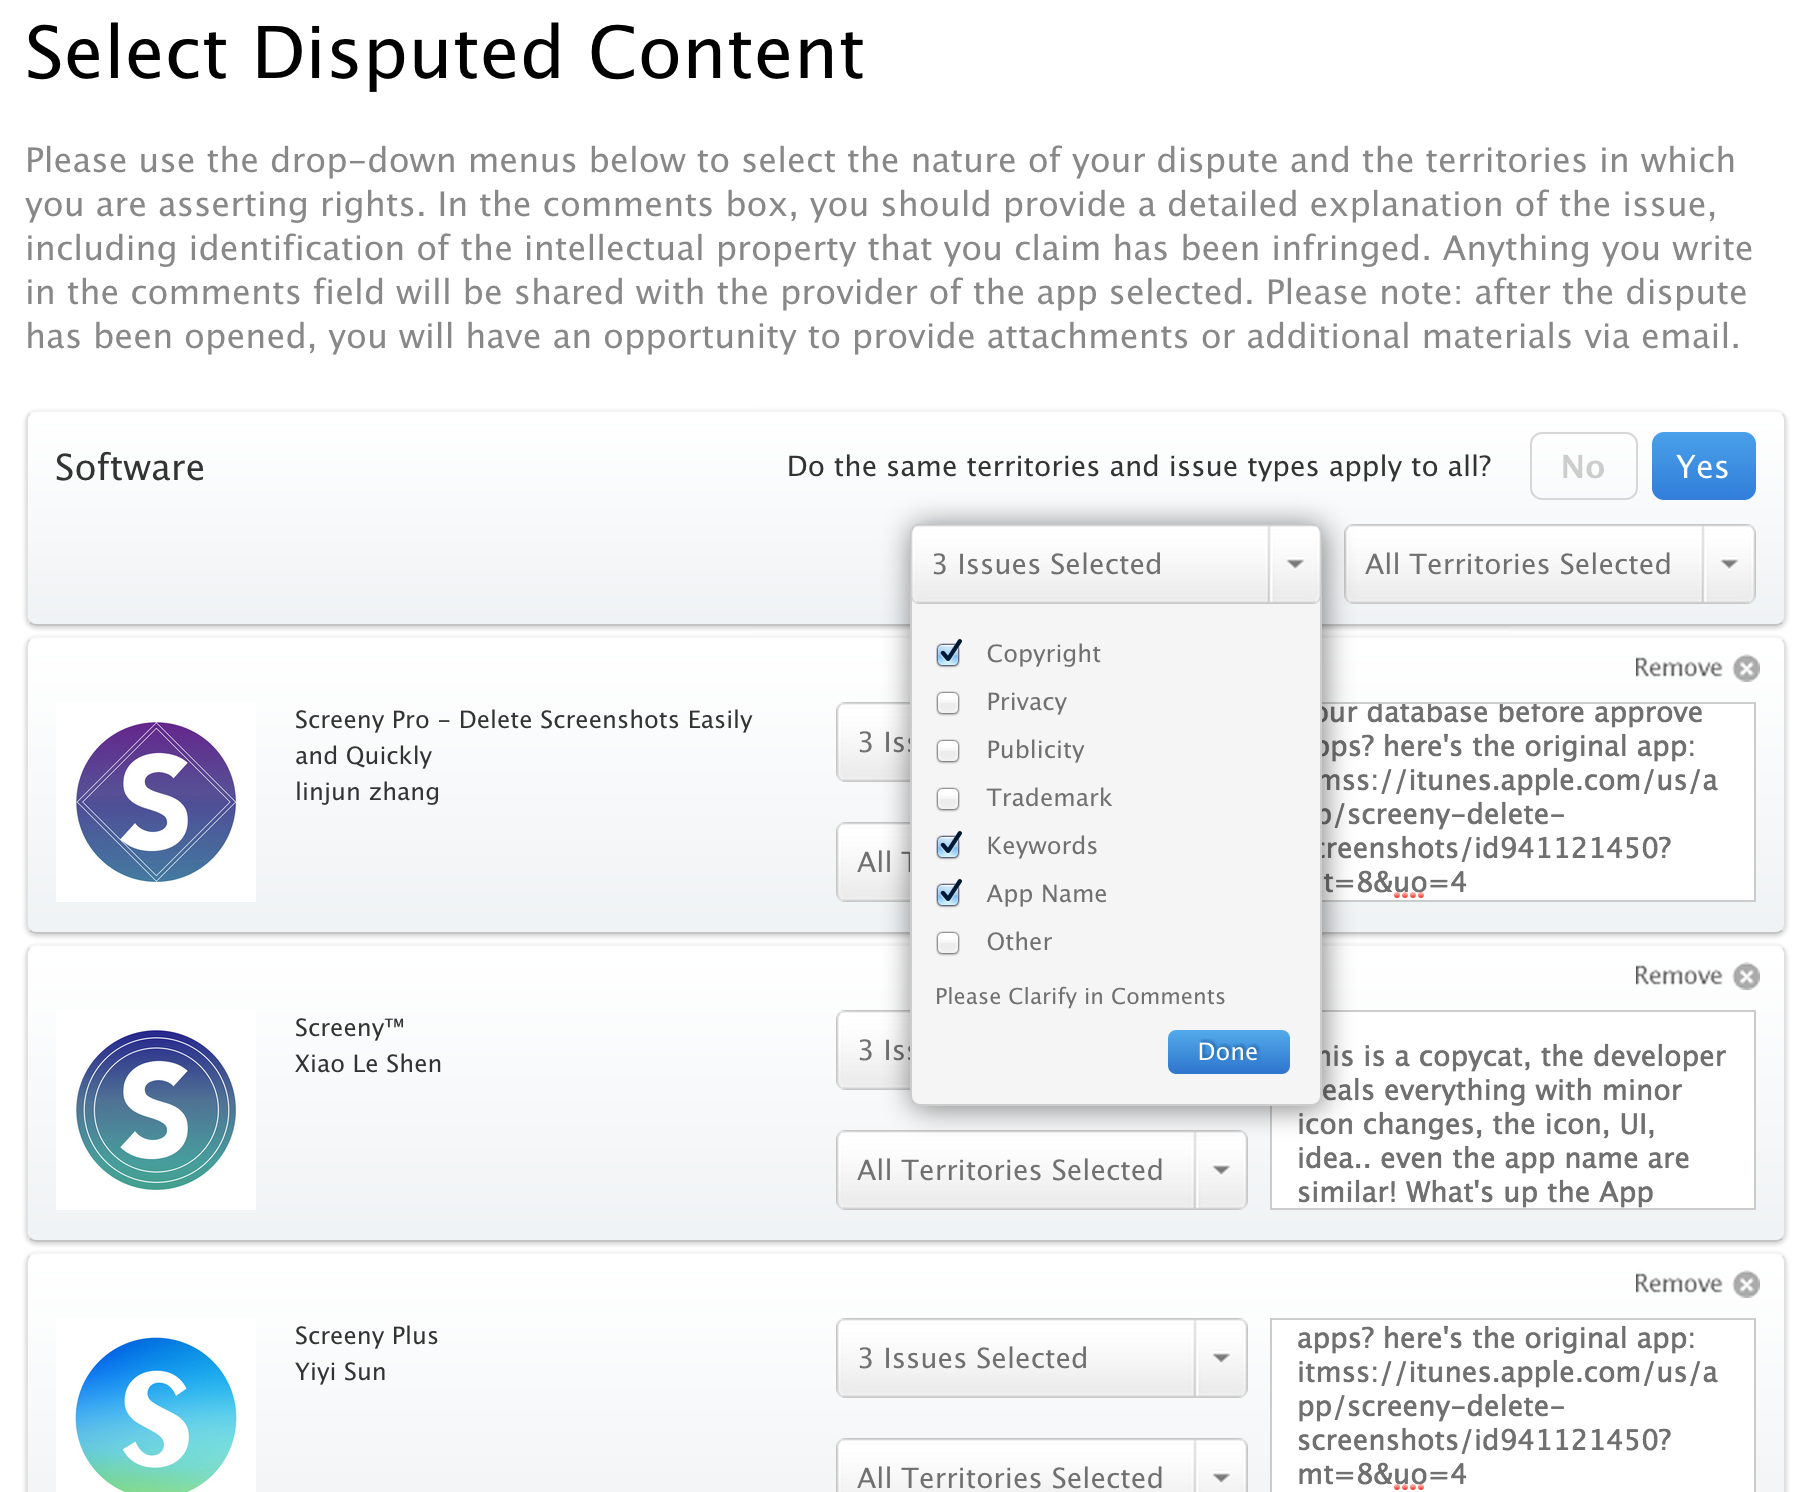
Cheers:
After uninstalling the app, you have to remove these shit:
In /System/Library/Extensions/:
In /System/Library/StartupItems/:
In /private/etc/: