Category: Blog

Main blog category, I’m too lazy to manage multiple categories so this blog has only one category.

  • Storm SSH Alternative for fish Shell

    It seems storm is no longer updated for years. So I found it’s actually really simple to implement Storm SSH’s searching feature via a simple function:

    function sshgrep
      grep -i -E -C 3 $argv ~/.ssh/config.d/*
    end

    Usage:

    ssh grep ixion
    /Users/sparanoid/.ssh/config.d/server-aws.conf-  Port 22
    /Users/sparanoid/.ssh/config.d/server-aws.conf-  User ssh-user
    /Users/sparanoid/.ssh/config.d/server-aws.conf-
    /Users/sparanoid/.ssh/config.d/server-aws.conf:Host ixion
    /Users/sparanoid/.ssh/config.d/signcl-aws.conf-  HostName 11.22.33.44
    /Users/sparanoid/.ssh/config.d/server-aws.conf-  Port 22
    /Users/sparanoid/.ssh/config.d/server-aws.conf-  User ssh-user
    
  • Mac mini 10GbE Packet Loss Issue with Energy Efficient Ethernet (EEE)

    64 bytes from 10.0.1.2: icmp_seq=772 ttl=64 time=2.401 ms
    64 bytes from 10.0.1.2: icmp_seq=773 ttl=64 time=2.958 ms
    Request timeout for icmp_seq 774
    Request timeout for icmp_seq 775
    Request timeout for icmp_seq 776
    Request timeout for icmp_seq 777
    Request timeout for icmp_seq 778
    64 bytes from 10.0.1.2: icmp_seq=779 ttl=64 time=2.457 ms
    64 bytes from 10.0.1.2: icmp_seq=780 ttl=64 time=2.173 ms
    64 bytes from 10.0.1.2: icmp_seq=781 ttl=64 time=2.325 ms
    64 bytes from 10.0.1.2: icmp_seq=782 ttl=64 time=2.803 ms

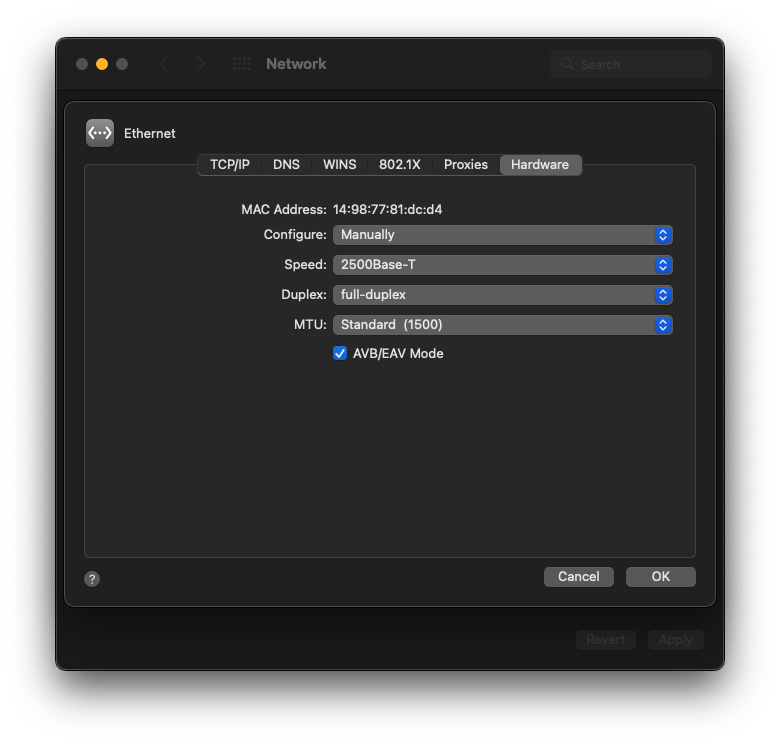
    If you got packet loss issue with 10GbE Mac mini. Try to disable Energy Efficient Ethernet on your Network pane in System Preferences:

    Network pane in macOS System Preferences

    You have to manually configure your Ethernet with full-duplex only. Then your network should be back to normal.

  • GitHub Actions – Cross Repository Event Triggering with Repository Dispatch

    What repository_dispatch can do in this post: When some tasks finish processing in repository A. Send a webhook payload to trigger GitHub Actions in repository B.

    In .github/workflows/build.yml from repository A:

        - name: Notify project-b
          if: github.event_name != 'pull_request'
          run: |
            curl -X POST -H "Accept: application/vnd.github.v3+json" \
              -H "Authorization: Bearer ${{ secrets.PAT_SPARANOID }}" \
              https://api.github.com/repos/sparanoid/project-b/dispatches \
              -d '{"event_type":"webhook"}'

    In .github/workflows/build.yml from repository B:

    name: Build
    
    on:
      # ... other options
      repository_dispatch:
        types:
          - webhook
    
    # ...
    jobs:
      build:
        # do your staff...
  • Custom VS Code Activity Bar Color Scheme for Light Color Mode

    Search for workbench.colorCustomizations in your VS Code settings.json and add the following:

      "workbench.colorCustomizations": {
        "[Default Light*]": {
          "activityBar.background": "#ededed",
          "activityBar.activeBorder": "#222",
          "activityBar.activeBackground": "#22222210",
          "activityBar.activeFocusBorder": "#007acc",
          "activityBar.border": "#ddd",
          "activityBar.dropBorder": "#222",
          "activityBar.foreground": "#222",
          "activityBar.inactiveForeground": "#888",
          "activityBarBadge.background": "#007acc",
          "activityBarBadge.foreground": "#fff",
        },
      },

    Result:

  • Global Homebrew PATH Prefix for macOS

    Based on Homebrew’s FAQ you can set prefix in PATH for all GUI apps which is not enabled by default:

    user$ sudo launchctl config user path "$(brew --prefix)/bin:${PATH}"
    Configuration applied. You must reboot for changes to take effect.

    According to this answer. The sudo launchctl config user path <...> command updates /private/var/db/com.apple.xpc.launchd/config/user.plist:

    <?xml version="1.0" encoding="UTF-8"?>
    <!DOCTYPE plist PUBLIC "-//Apple//DTD PLIST 1.0//EN" "http://www.apple.com/DTDs/PropertyList-1.0.dtd">
    <plist version="1.0">
    <dict>
    	<key>PathEnvironmentVariable</key>
    	<string>/opt/homebrew/bin:/usr/bin:/bin:/usr/sbin:/sbin</string>
    </dict>
    </plist>

    You can query launchd‘s current settings via:

    launchctl getenv PATH

    Related: You can also query the default PATH by executing:

    sysctl user.cs_path

    Test script with clear environment:

    env -i git commit
  • Herman Miller Embody Seat Replacement Manual (PDF)

    I did not find any online manual available for it. Here’s what I’ve got from Herman Miller with my seat replacement.

  • Show macOS Sleep States

    pmset -g log | grep -E 'Wake from|Entering Sleep'
  • Remove/Uninstall Rosetta 2 from Apple Silicon Macs

    1. Obtain a list of files/directories and LaunchAgents with: pkgutil --files com.apple.pkg.RosettaUpdateAuto
    2. Save them in a way that you can access them in the recovery
    3. Boot into recovery mode: Press and hold the power button on your Mac until “Loading startup options” appears.
    4. Open Terminal in recovery mode
    5. Run csrutil disable and confirm (temporary disable SIP)
    6. Reboot
    7. Delete the files listed at step 1 (in my case it was enough to delete /Library/Apple/usr/share/rosetta and /Library/Apple/usr/libexec with all their contents)
    8. Remember to empty the Trash
    9. Reboot back to recovery
    10. Run csrutil enable and confirm

    Sample pkgutil output:

    $ pkgutil --files com.apple.pkg.RosettaUpdateAuto
    Library
    Library/Apple
    Library/Apple/usr
    Library/Apple/usr/lib
    Library/Apple/usr/lib/libRosettaAot.dylib
    Library/Apple/usr/libexec
    Library/Apple/usr/libexec/oah
    Library/Apple/usr/libexec/oah/debugserver
    Library/Apple/usr/libexec/oah/libRosettaRuntime
    Library/Apple/usr/libexec/oah/runtime
    Library/Apple/usr/libexec/oah/translate_tool
    Library/Apple/usr/share
    Library/Apple/usr/share/rosetta
    Library/Apple/usr/share/rosetta/rosetta
  • Migrate Homebrew from Intel Macs to Apple Silicon Macs

    Dump all your existing Homebrew packages:

    brew bundle dump

    If you’re using custom shell installed by Homebrew (ie. fish), change it back to bash temporarily:

    chsh -s /bin/bash

    You may also need to change this in System Preferences – Users & Groups (right click on your avatar and choose Advanced Options…)

    Uninstall existing Homebrew (and all its packages):

    curl -fsSL -o /tmp/uninstall.sh https://raw.githubusercontent.com/Homebrew/install/HEAD/uninstall.sh
    /bin/bash /tmp/uninstall.sh --path=/usr/local
    (more…)
  • Web3 is not decentralization – InvisibleUp

    Web3 is not decentralized. Nothing that is dependent on a single organization is decentralized. Nothing whose primary goal is to generate a profit for its founders is decentralized. Can we please stop pretending they are?

    Source: Web3 is not decentralization – Articles – InvisibleUp

  • Nginx Notion Proxy

    What these configs do:

    • Proxy all traffic from Notion to your custom domain notion.example.tld and deliver it to your clients
    • WebSocket proxy support
    • Image local disk caching support
    • Correct URL rewriting
    • Get access logs from real request IPs

    This post is a proof of concept proxying a general XaaS without using any vendor-locked FaaS such as Cloudflare Workers or AWS Lambda.

    (more…)
  • Nginx Multiple Upstreams with HTTPS Support

    This example can make sure all requests to the upstreams are handled via HTTPS.

    upstream source.example.tld {
      server s1.example.tld:443;
      server s2.example.tld:443 max_fails=2 fail_timeout=5s;
      server s2.example.tld:443;
    }
    
    server {
        proxy_pass https://source.example.tld/;
        proxy_ssl_protocols     TLSv1.2 TLSv1.3;
        proxy_ssl_verify        off;
        proxy_ssl_session_reuse on;
    }
  • Composite Actions vs Reusable Workflows | Blogmarks

    There is a lot of overlap between these features and there are certainly some tasks that could be accomplished with either. Simultaneously, there are some important differences that drive a bit of a wedge between them.

    Source: Composite Actions vs Reusable Workflows | Blogmarks

  • Running HomeBridge on Docker without Host Network Mode | Dev With Imagination

    There is a docker image available, but the setup instructions for this require the container to be ran with the “host” networking mode. The primary reason for this appears to be to allow an Avahi daemon to run in the container and be able to answer responses to mDNS requests, which requires the container to be in the same local network subnet as the device performing the lookup.

    Source: Running HomeBridge on Docker without Host Network Mode | Dev With Imagination

  • Nginx `nodelay` Option in Action

    The nodelay option for limit_req can delay excessive requests but it’s not desired in some situations. I just found an intuitive way to show the difference while tweaking the GitHub Avatar proxy.

    Every grid is an image loaded from GitHub avatar.

    With nodelay:

    Without nodelay:

    So in my use case with nodelay option can make clients feel faster loading. But may hit request limit more easily. Without nodelay keep excessive requests in the burst bucket and load them in sequence. But clients may feel slow.

  • Remove Tencent Cloud (QCloud) Cloud Monitor

    bash /usr/local/qcloud/stargate/admin/uninstall.sh
    bash /usr/local/qcloud/YunJing/uninst.sh
    bash /usr/local/qcloud/monitor/barad/admin/uninstall.sh
    
    rm -rf /usr/local/sa
    rm -rf /usr/local/agenttools
    rm -rf /usr/local/qcloud
    
    process=(sap100 secu-tcs-agent sgagent64 barad_agent agent agentPlugInD pvdriver )
    for i in ${process[@]}
    do
      for A in $(ps aux | grep $i | grep -v grep | awk '{print $2}')
      do
        kill -9 $A
      done
    done
    
    # Optional
    chkconfig --level 35 postfix off
    systemctl stop postfix
    systemctl mask postfix
  • Docker Mounted Volumes Permission Issues with Nginx and PHP-FPM

    Prerequisites:

    • Official Nginx alpine Docker image
    • Official PHP Docker (Debian) image with fpm tags

    Get currenty PHP-FPM running user info:

    $ docker exec php_container_name id www-data
    uid=33(www-data) gid=33(www-data) groups=33(www-data)

    Change the owner of your existing mounted volume:

    chown 33:33 -R /srv/www
  • Disable Vim Mouse on Debian

    Recently I’m trying to switch from deprecated CentOS to Debian but found the default Vim configurations on Debian enables mouse option is driving me nuts. You can add the following option in /etc/vim/vimrc.local to disable it:

    set ttymouse=
  • Custom WordPress robots.txt Without Plugins

    Inspired by Modify the robots.txt file from wpvip.com

    /**
     * Custom robots.txt
     */
    if ( ! function_exists( 'custom_robotstxt' ) ) :
      function custom_robotstxt() {
        echo "User-agent: MJ12bot" . PHP_EOL;
        echo "Disallow: /" . PHP_EOL;
      }
      add_action( 'do_robotstxt', 'custom_robotstxt' );
    endif;
  • GMMK Pro Restores to Original Firmware from VIA

    Minimal guide how to flash GMMK Pro keyboard from factory firmware to VIA firmware and vice versa.

    Factory firmware to VIA firmware

    • Download VIA firmware
    • Download QMK Toolbox
    • Unplug your keyboard and reconnect it while holding the spacebar and B at the same time
    • You should see a message in the QMK Toolbox that indicates that your board is in STM DFU Bootloader Mode.
    • Load the VIA firmware and press Flash

    VIA firmware to factory firmware

    • Download factory firmware (Backup)
    • Unplug your keyboard and reconnect it while holding the ESC (The official guide is wrong that tells you to hold spacebar and B)
    • You should see a message in the QMK Toolbox that indicates that your board is in STM DFU Bootloader Mode.
    • Load the factory firmware and press Flash

  • NPM Publish Error 402 Payment Required – You must sign up for private packages

    When publishing public scoped packages you might get the following errors:

    npm ERR! code E402
    npm ERR! 402 Payment Required - PUT https://registry.npmjs.org/.... - You must sign up for private packages

    This happens when trying to publish public scoped packages. The default access level is private. To resolve this you can either set npm config set access public or add the following to your package.json:

    "publishConfig": {
      "access": "public",
      "registry": "https://registry.npmjs.org/"
    },
  • Microsoft 365 Excel Performance Hack for UHD Displays in Windows

    If you have a large spreadsheet to edit (ie. 10k+ columns) with your UHD display (ie. 4K or higher resolution) in Microsoft 365 Excel you may have some performance issues when scrolling.

    I just found an easy hack that works for me:

    1. Check Disable hardware graphics acceleration in Excel under File – Options – Advanced – Display section
    2. Exit Excel
    3. Change your display resolution to 1920×1080
    4. Change text scale to 100%
    5. Open the spreadsheet you need to edit with Excel
    6. Change your display resolution back to native resolution
    7. Change text scale back to your original option (ie. 200%)
    8. See magic happens

    This hack works until you exit your Excel. So you have to redo step 3-8 when openning new documents.

  • Download Bilibili 4K Videos. The Hard Way

    Requirements:

    • Google Chrome installed
    • Get cookies.txt extension installed
    • youtube-dl installed
    • FFmpeg installed
    • Active bilibili membership (to get 4K streaming perk)
    • Basic JSON and Bash knowledge

    Steps:

    • Open the video page you want to download with Google Chrome
    • Open Web Inspector and refresh the page
    • Change video quality to some lower ones (like 480p) and change back to 4K
    • Search for player/playurl in Inspector
    • You should get a JSON payload returned:

    Then select one of the most recent requests with accept_quality that has 120 in array:

    Then select down to the data.dash.video[0].baseUrl and data.dash.audio[0].baseUrl. Remember these URLs:

    Open Get cookies.txt extension and download your current cookies.

    Download video and audio with youtube-dl:

    youtube-dl --cookies bilibili.com_cookies.txt --referer 'https://www.bilibili.com/video/BV1d5411g7g2' 'https://xxx.mcdn.bilivideo.cn:4483/upgcxcode/12/67/336676712/336676712-1-30232.m4s...'

    Then you will get two files like the following:

    • 20210510 336676712-1-30280 [336676712-1-30280].m4s
    • 20210510 336676712-1-30120 [336676712-1-30120].m4s

    Rename the video extension to mp4 and audio to m4a. Play them to check if everything works.

    Combine these two with FFmpeg:

    ffmpeg -i 20210510\ 336676712-1-30120\ \[336676712-1-30120\].mp4 -i 20210510\ 336676712-1-30280\ \[336676712-1-30280\].m4a -c copy output-combined.mp4

  • Current Working Directory for Different OS and Tools

    • Bash: $(pwd)
    • fish: (pwd)
    • Windows Command Line (cmd): %cd%
    • PowerShell: $(PWD) (Case-insensitive)
  • Fix Invalid Package Name “.DS_Store” for Node.js NPM Global Update on macOS

    If you got the following error message when run npm update -g:

    $ npm update -g
    npm ERR! code EINVALIDPACKAGENAME
    npm ERR! Invalid package name ".DS_Store": name cannot start with a period
    
    npm ERR! A complete log of this run can be found in:
    npm ERR!     /Users/sparanoid/.npm/_logs/2021-04-28T13_59_32_013Z-debug.log

    Simply run if you installed your Node.js via Homebrew:

    find /usr/local -name '.DS_Store' -type f -print -delete

    Or the following for M1:

    find /opt/homebrew/lib -name '.DS_Store' -type f -print -delete

  • Make pyenv Play Nice with Homebrew in fish Shell

    # Make pyenv play nice with Homebrew
    # https://github.com/pyenv/pyenv/issues/106
    alias brew="env PATH=(string replace (pyenv root)/shims '' (echo $PATH)) brew"
  • Using Motion Sensor as Occupancy Sensor for HomeKit with Homebridge

    Requirements:

    • A HomeKit enabled motion sensor. I use Aqara Motion Sensor Hue Motion Sensor
      • The update interval of Hue Motion Sensor exposes to HomeKit is 10 seconds. Far better than Aqara Motion Sensor (120 seconds). And seems more stable after testing for months.
    • A HomeKit enabled accessory to be controlled
    • Homebridge with homebridge-delay-switch plugin installed

    Goals:

    • You want to stick with local automation instead of configuring automations in vendor specific apps
    • Trigger an open/turn on/start event when motion detected
    • When no motion for specific minutes. Trigger another event to close/turn off/stop

    Why? This method no longer depends on the buggy HomeKit built-in “Turn Off” and Stops Detecting Motion feature. Common HomeKit motion sensors only update the motion state every [latex]n[/latex] seconds. When Stops Detecting Motion triggers. It won’t be canceled or delayed when it detects another motion during the [latex]n[/latex] detection interval. That causes your accessory to be turned off even motion detects during the time you set.

    With my method. Your accessory won’t be turned off if your motion sensor detects motion during the specific time you set. Make your motion sensor work more like an occupancy sensor.

    First. Add a delay switch in Homebridge:

    {
        "name": "Living Room Delay Switch",
        "delay": 300000,
        "disableSensor": false,
        "startOnReboot": false,
        "accessory": "DelaySwitch"
    },

    The delay time is in milliseconds so 300000 equals 6 minutes here.

    In your Home app. Create the following automations:

    First Automation

    • When: Living Room Motion Sensor – Detects Motion
    • Accessories:
      • Turn on your accessory
      • Turn on your Living Room Delay Switch

    Second Automation

    • When: Living Room Delay Switch Trigger – Detects Motion
    • Accessories:
      • Turn off your accessory

    Third Automation

    This automation is important. It can ensure your accessory can still be turned off at a specific time if the accessory was opened/turned on/started manually.

    • When: Living Room Sensor – Stops Detecting Motion
    • Accessories:
      • Turn on your Living Room Delay Switch
  • Detecting WeChat In-App Browser via Nginx User-Agent

    You can use this directive to check for WeChat in-app browser and set cache off:

    if ($http_user_agent ~* "MicroMessenger") {
      set $skip_cache 1;
    }
  • How to Install LineageOS on OnePlus 3T with GApps

    This is the minimal guide for installing LineageOS 17.1 on OnePlus 3T abtracted from LineageOS offical guide. It works at the time of writing so no gurantee for further updates.

    1. Enable OEM unlocking and USB debugging on your phone with developer mode.
    2. Download latest Android platform tools for Windows, for Linux, or for macOS from Google. The full guide can be found at Using ADB and fastboot.
    3. Connect your phone into your computer with USB mode.
    4. Install the built-in OnePlus USB Drivers or use UniversalAdbDriver.
    5. cd to the platform-tools directory, run adb devices to see if your phone is connected.
    6. Run adb reboot bootloader to boot your phone into bootloader mode.
    7. Run fastboot devices while in bootloader mode to see if your computer still connects to it.
    8. Run fastboot oem unlock. Your phone should be reset and reboot automatically.
    9. Setup your phone. Then re-enable USB debugging.
    10. Download latest custom recovery from TWRP.
    11. Run adb reboot bootloader to boot your phone into bootloader mode. Also make sure your phone can be find in fastboot mode by re-typing fastboot devices.
    12. Run fastboot flash twrp-3.4.0-0-oneplus3.img to flash custom recovery.
    13. Run fastboot boot twrp-3.4.0-0-oneplus3.img to boot into new recovery mode.
    14. Download the LineageOS installation package.
    15. Download Google Apps using the arm64 architecture. Choose the packages you prefer (I recommend nano package).
    16. In recovery mode, tap Swipe Format Data
    17. Return to the previous menu and tap Advanced Wipe, then select the Cache and System partitions and then Swipe to Wipe.
    18. Sideload the LineageOS and Google Apps packages:
      1. On your phone, tap AdvancedADB Sideload, then swipe to begin sideload
      2. On your computer, sideload the package using adb sideload lineage-17.1-20201026-nightly-oneplus3-signed.zip.
      3. Then sideload the Google Apps using adb sideload open_gapps-arm64-10.0-nano-20201031.zip.
    19. Back to recovery main menu. Reboot your device.
    20. Setup your LineageOS.
  • Issue with Adding External Project as a Git Submodule “already exists in the index”

    When you tried to move part of your code to external repo and later add it back as a git submodule you may see this error:

    'lib/my-repo' already exists in the index

    Then you can try the following:

    git rm -rf 'lib/my-repo'
    git submodule add https://github.com/sparanoid/my-external-repo lib/my-repo
  • Apple AirPods Pro vs Sony WH-1000XM4 vs Samsung Galaxy Buds+

    不废话,来个经典的优缺点列表式测评

    Apple AirPods Pro

    优点

    • 优质的 ANC(主动降噪)效果,主管感受上基本打平 Sony
    • 无敌的 Transparency Mode,在目前所有的 TWS 中是最强的,穿透进来的环境声音不强不弱,大部分情况下确实可以达到「transparent」的水准
    • 小巧便携,放进裤兜里即可
    • 与 Apple 设备高度集成,体验流畅

    缺点

    • 续航短,开启 ANC 基本就 3 个小时左右,只适用于国内航班
    • 不支持多设备同时在线(类似蓝牙 Multipoint 的特性)
    • 低频表现一般

    Sony WH-1000XM4

    优点

    • 手感、做工不错
    • 超长续航,开启 ANC 也可以有 30 小时的续航,轻松应对国际航班/一整天的工作环境
    • 双设备同时在线
    • 可以 3.5 mm 有线连接

    缺点

    这款耳机的很多优点也都是它的缺点,比如:

    • 虽然支持超长续航,但没有无线充电或 Qi 充电
    • 支持双设备同时在线,但仅支持双设备,不支持更多设备,也不支持多设备快速切换。并且开启双设备同时在线后,无法开启 LDAC,这点很重要,没有 LDAC 的 1000XM4 音质真的只能用渣来形容,然而这一点几乎所有的 KOL 、测评都不会提及
    • 用 3.5 mm 有线连接后,如果这时候你拔出接头,耳机会执行一次关机,不知道这样设计的逻辑是什么?导致我每次关机后都需要再手动开机然后蓝牙配对
    • 耳机上执行上划/下划切换音量时并没有绑定系统音量。也就是说这个切换不会同步设备中的系统音量

    除此之外还有以下缺点:

    • 佩戴不舒适,真不知道是不是索尼在国内的水军太多了,还是我的头部构造离谱。我佩戴超过 2 小时后必头疼,夹耳朵,无论怎样调整都夹耳朵
    • 环境音模式(类似 AirPods Pro 的 Transparency Mode)效果很一般,开启低等级听不清人声,开启高等级后底噪高的离谱。可能全封闭式耳机想要达到入耳式耳塞的「透明模式」的效果确实更难一些

    Samsung Galaxy Buds+

    作为这几款中最便宜的耳机,也是唯一没有主动降噪的耳机。不能要求过多:

    优点

    • 价格便宜
    • 续航略优于 AIrPods Pro
    • 但在 Galaxy Wearable 中,可以调出「超高环境音量」模式,可以将环境音以高于正常的音量传入耳朵。很有意思,感觉像带了耳返

    缺点

    • 没有 LDAC
    • 由于它造型的原因,无法或较难单手打开电池仓
    • 与 1000XM4 一样操作音量时不会绑定系统音量,不过这个默认是关闭的,在「实验室功能」里

  • The Simplest MediaWiki Update Script for Single-Server MediaWiki Site

    System requirements:

    • User uploads $wgUploadDirectory are stored offsite
    • Non-Docker MediaWiki with normal setup
    • Composor installed (Can be installed automatically during updating)

    Goals:

    • Update MediaWiki with nearly zero downtime
    • Download and install latest tagged MediaWiki from tarball package
    • Update extensions and skins from latest git tagged branch
    • Install extension-specific dependencies during updating
    (more…)
  • GeoIP Bypassing for Nginx Proxy

    Goal:

    • Proxy content for requests in specific country or region
    • Redirect any requests made outside specific country or region to original URL (to save bandwidth
    geoip_country         /usr/share/GeoIP/GeoIPv6.dat;
    map $geoip_country_code $proxy_direct_pass {
      default yes;
      CN no;
    }
    
    location ~* ^/proxied-content/(.*)$ {
      if ($proxy_direct_pass = yes) {
        return 302 https://original_content/$1$is_args$args;
      }
    
      proxy_pass https://original_content/$1$is_args$args;
    }
  • Proxying and Caching WebP Images Using the Same URI Based on User Accept Headers with Nginx

    Case:

    • The proxied image backend serves WebP images when the client requests support it with Accept headers ($http_accept)
    • The backend also provides the same URI for all WebP requests. That means URI like image.png can also be in WebP format

    The solution:

    • Using Nginx map module
    • Apply variables to different cache pools

    In nginx.conf:

    # Proxy cache pools for image caching
    proxy_cache_path        /dev/shm/image_cache
                            keys_zone=image_cache:10m;
    
    proxy_cache_path        /dev/shm/image_cache_webp
                            keys_zone=image_cache_webp:10m;
    
    # Differenate WebP requests
    map $http_accept $webp_pool {
      default                 image_cache;
      ~*webp                  image_cache_webp;
    }

    In your site config:

    proxy_cache             $webp_pool;
  • Change Android Device Timezone with ADB

    adb shell settings put global time_zone America/New_York
  • Use IKEA TRÅDFRI Driver with HomeKit

    You must use IKEA TRÅDFRI Gateway to add your drivers. Philips Hue Bridge can add TRÅDFRI drivers but they won’t appear in your Home app. That means TRÅDFRI drivers with Philips Hue Bridge won’t work with HomeKit. So dig into your pockets to buy a TRÅDFRI Gateway.

    After you setting up your TRÅDFRI Gateway with IKEA Home smart app. The app will force you to add a controller (Wireless Dimmer, On-Off Switch/Dimmer, etc.) to control any smart accessory. That prevents you from adding any driver directly to the app. You have to add the driver through a controller. So again, dig deeper into your pockets to buy a switch/dimmer. I recommend TRÅDFRI Wireless dimmer. I just bought one as the device adoptor since I won’t use it to control my accessories.

    You can pair the wireless dimmer with more than one drivers. When you push on/off on the dimmer. All paired drivers will respond. It’s okay if you just use it as the device adoptor like me. But if you want to use it later as a normal dimmer. Just remove it from the app and re-pair it the right driver.

    Don’t buy any other IKEA smart accessories at the time of writing. Like motion sensors, bulbs, etc. Blinds are okay but reported the motors are louder than other brands. That means most of them suck.

    Update Mar 8, 2021: Recently IKEA announced that they add HomeKit support for existing TRÅDFRI Shortcut Buttons and TRÅDFRI Motion Sensors. Recently I purchased these two products and did some tests:

    • Recommended: TRÅDFRI Shortcut Buttons. It responds faster than Aqara Wireless Mini Switch. It has smaller form compared to Hue switches. Zigbee connection is also stable.
    • Not recommended: TRÅDFRI Motion Sensors. The most recent revision can’t change the detection interval. It only detects motion every 180 seconds. Even worse than Aqara Motion Sensor.
  • Low Latency HomeKit Camera Support: Homebridge FFmpeg Plugin with Custom Codec Configuration

    Stream passthrough method for low latency HomeKit camera support:

    • Device: EZVIZ (萤石) CS-C6CN-3H2CWF (星光夜视版)
    • Low latency (as low as 100ms) from the camera to homebridge-camera-ffmpeg
    • Low CPU load since all streams are passthrough from FFmpeg without re-encoding
    • No audio support due to compatibility issue from the source stream

    The configuration should be look like:

    "videoConfig": {
        "source": "-rtsp_transport tcp -i rtsp://admin:<device_passcode>@<device_ip>:554/h265/ch1/main/av_stream",
        "maxFPS": 30,
        "audio": false,
        "vcodec": "copy",
    }

    Here’s the tricky part: the EZVIZ CS-C6CN-3H2CWF will output h265 by default, which is not supported by HAP. And the default bitrate is also too high to handle for iOS devices. So you will need to update some settings for the camera:

    • Download the Chinese version of EZVIZ Studio from the official website (direct link).
    • Install and run
    • Click 本地设备 (Local Devices) on the sidebar
    • Right-click the camera you want to modify, then choose 高级设置 (Advanced Settings)
    • In the popup window, click 图像 (Images) – 视音频 (Audio/Video) on the sidebar, change the following settings:
      • 编码类型 (Encoding Type): STD_H264
      • 码率上限 (Bitrate Limit): 1024 Kbps
      • (Optional) 分辨率 (Resolution): HD720P
    • Click 保存 (Save) to save the settings

    Please note this step will slightly reduce the quality of your video stream when you view the stream in EZVIZ official app, but it’s mandatory for the camera to work with HomeKit.

    Bonus: audio support without compiling FFmpeg after version 1.0.0:

    "videoConfig": {
        "source": "-rtsp_transport tcp -i rtsp://admin:<device_passcode>@<device_ip>:554/h265/ch1/main/av_stream",
        "maxFPS": 30,
        "audio": true
    }

    This will make FFmpeg re-encode your stream and hurt your CPU. The latency is about 0.6-1 second. I suggest you install Homebridge on a Mac mini for better performance.

    Update for homebridge-camera-ffmpeg 3.0.0 and later: It’s finally stable enough to stream passthough with audio support. You can now use the following config:

    "videoConfig": {
        "source": "-rtsp_transport tcp -i rtsp://admin:<device_passcode>@<device_ip>:554/h265/ch1/main/av_stream",
        "maxFPS": 30,
        "audio": true,
        "vcodec": "copy",
    }
  • Allow WordPress Embedded Posts with Global X-Frame-Options for Nginx Servers

    The problem: when you enables X-Frame-Options globally. You won’t be able to embed your posts with latest WordPress embed posts method.

    The solution: you can simply exclude it in your Nginx configuration. I’ll use Nginx map for better performance:

    map $request_uri $x_frame_options_headers {
      default                 SAMEORIGIN;
      # Matching WordPress embed page, ie. https://example.com/my-post/embed#?secret=vLi4CQcWkH
      ~/embed                 "";
    }
    
    # Don't allow the browser to render the page inside an frame or iframe
    add_header X-Frame-Options $x_frame_options_headers;
    Embedding Demo
  • About bash_profile and bashrc on macOS – Scripting OS X

    Note: bash_profile is completely different from configuration profiles. Learn more about Configuration Profiles in my book: ‘Property Lists, Preferences and Profiles for Apple Administrators’ Note:…

    Source: About bash_profile and bashrc on macOS – Scripting OS X

  • balenaEtcher: Source and destination checksums do not match errors

    If you got the following errors:

    \\.\PhysicalDrive1: Source and destination checksums do not match: <hash1> !== <hash2>

    You can try to disable removable drives to be added to libraries setting for System Volume Information folder creation:

    How to prevent creation of “System Volume Information” folder in Windows 10 for USB flash drives?

  • How to fix gyp: No Xcode or CLT version detected

    xcode-select -print-path
    /Library/Developer/CommandLineTools
    sudo rm -rf /Library/Developer/CommandLineTools
    xcode-select --install

    Update Nov 7, 2020, 5:33 PM:

    With latest release of Xcode 12. This method no longer worked for macOS Catalina (10.15.7) and Big Sur. You should download it manually from Apple.

  • PayPal Donate Button – My Saved Buttons Link URL

    Just visit:

    https://www.paypal.com/cgi-bin/webscr?cmd=_button-management
  • Restart Transmission from Synology Terminal

    /var/packages/transmission/scripts/start-stop-status stop
    /var/packages/transmission/scripts/start-stop-status start

    …or:

    synopkg restart transmission
  • Restart macOS Screen Sharing Service via SSH

    Sometimes screen sharing service on your headless Mac mini may crash. This should fix the issue:

    sudo launchctl unload /System/Library/LaunchDaemons/com.apple.screensharing.plist  
    sudo launchctl load -w /System/Library/LaunchDaemons/com.apple.screensharing.plist
  • Install Zerotier One on UniFi Cloud Key

    Run the following commands on your UniFi Cloud Key:

    NOTE: This guide is outdated. See latest offical support for UniFi devices:

    https://docs.zerotier.com/devices/ubiquiti/

    curl -s https://install.zerotier.com | bash

    Output:

    *** ZeroTier One Quick Install for Unix-like Systems
    
    *** Tested distributions and architectures:
    ***   MacOS (10.7+) on x86_64 (just installs ZeroTier One.pkg)
    ***   Debian (7+) on x86_64, x86, arm, and arm64
    ***   RedHat/CentOS (6+) on x86_64 and x86
    ***   Fedora (16+) on x86_64 and x86
    ***   SuSE (12+) on x86_64 and x86
    ***   Mint (18+) on x86_64, x86, arm, and arm64
    
    *** Please report problems to [email protected] and we will try to fix.
    
    *** Detecting Linux Distribution
    
    *** Found Debian "jessie" (or similar), creating /etc/apt/sources.list.d/zerotier.list
    OK
    
    *** Installing zerotier-one package...
    Hit https://deb.nodesource.com jessie InRelease                                                                                                  
    Hit https://deb.nodesource.com jessie/main armhf Packages                                                                                                                                              
    Get:1 http://download.zerotier.com jessie InRelease [20.9 kB]                                              
    Ign http://httpredir.debian.org jessie InRelease                                                                                
    Get:2 http://security.debian.org jessie/updates InRelease [44.9 kB]                                                   
    Hit http://www.ubnt.com cloudkey-stable InRelease                                           
    Hit http://www.ubnt.com cloudkey-stable/ubiquiti armhf Packages                                                     
    Hit http://httpredir.debian.org jessie Release.gpg                                   
    Get:3 http://download.zerotier.com jessie/main armhf Packages [2479 B]
    Hit http://httpredir.debian.org jessie Release                                          
    Hit http://httpredir.debian.org jessie/main armhf Packages                                                                                                                                             
    Hit http://httpredir.debian.org jessie/contrib armhf Packages                                                                                                                                          
    Hit http://httpredir.debian.org jessie/non-free armhf Packages                                                                                                                                         
    Get:4 http://security.debian.org jessie/updates/main armhf Packages [695 kB]                                                                                                                           
    Hit http://security.debian.org jessie/updates/contrib armhf Packages                                                                                                                                   
    Hit http://security.debian.org jessie/updates/non-free armhf Packages                                                                                                                                  
    Fetched 764 kB in 1s (764 KB/s)                                                                                                                                                                  
    Reading package lists... Done
    Reading package lists... Done
    Building dependency tree       
    Reading state information... Done
    The following NEW packages will be installed:
      zerotier-one
    0 upgraded, 1 newly installed, 0 to remove and 2 not upgraded.
    Need to get 763 kB of archives.
    After this operation, 2366 kB of additional disk space will be used.
    Get:1 http://download.zerotier.com/debian/jessie/ jessie/main zerotier-one armhf 1.4.6 [763 kB]
    Fetched 763 kB in 44s (17.3 kB/s)                                                                                                                                                                      
    Selecting previously unselected package zerotier-one.
    (Reading database ... 23329 files and directories currently installed.)
    Preparing to unpack .../zerotier-one_1.4.6_armhf.deb ...
    Unpacking zerotier-one (1.4.6) ...
    Processing triggers for systemd (230-7~bpo8+2.ubnt+1) ...
    Setting up zerotier-one (1.4.6) ...
    Processing triggers for systemd (230-7~bpo8+2.ubnt+1) ...
    
    *** Enabling and starting zerotier-one service...
    Synchronizing state of zerotier-one.service with SysV service script with /lib/systemd/systemd-sysv-install.
    Executing: /lib/systemd/systemd-sysv-install enable zerotier-one
    
    *** Waiting for identity generation...
    
    *** Success! You are ZeroTier address [ e50a7c7fc2 ].

    Run zerotier-cli to see if everything works:

    zerotier-cli 
    ZeroTier One version 1.4.6 build 0 (platform 1 arch 3)
    Copyright (c) 2019 ZeroTier, Inc.
    Licensed under the ZeroTier BSL 1.1 (see LICENSE.txt)
    Usage: zerotier-cli [-switches] <command/path> [<args>]

    Please note after upgrading the Cloud Key firmware, you need to reinstall the Zerotier One package. And if you got the following error when trying to reinstall the package:

    *** Enabling and starting zerotier-one service...
    Synchronizing state of zerotier-one.service with SysV service script with /lib/systemd/systemd-sysv-install.
    Executing: /lib/systemd/systemd-sysv-install enable zerotier-one
    
    *** Waiting for identity generation...

    Press control – C and execute the following to restart the service and rejoin the Zerotier network:

    systemctl restart zerotier-one
    systemctl status zerotier-one
    zerotier-cli info
    200 info 8ade3af9ef 1.4.6 ONLINE
    zerotier-cli join eda9f5dbfe94adbe
    200 join OK
    # ...then approve it in your Zerotier dashboard
    # list network
    zerotier-cli listnetworks -j
  • Install OptiFine for Minecraft without Installing Java Runtime on macOS

    You can simply use Minecraft bundled Java runtime to install OptiFine.

    ~/Library/Application\ Support/minecraft/runtime/jre-x64/jre.bundle/Contents/Home/bin/java -jar /path/to/OptiFine_1.14.4_HD_U_F3.jar
  • Zip/Unzip Multi-volume Archives from Command Line

    Compress with level 0 means no compression, split then into 500 MB per slice.

    zip -0 -s 500m InstallESD InstallESD.dmg

    To merge/unzip them:

    zip -FF InstallESD.zip --out InstallESD-full.zip
  • Fixing TXTRDATATooLong Errors for AWS Route 53

    RFC 4408 3.1.3 says

    ....
         IN TXT "v=spf1 .... first" "second string..."
     
       MUST be treated as equivalent to
     
          IN TXT "v=spf1 .... firstsecond string..."
     
       SPF or TXT records containing multiple strings are useful in
       constructing records that would exceed the 255-byte maximum length of
       a string within a single TXT or SPF RR record.
    

    so if you are getting error “TXTRDATATooLong” a solution for you will be splitting it into multiple strings within the same record set. For example, instead of:

    "v=DKIM1; k=rsa; g=*; s=email; h=sha1; t=s; p=MIGfMA0GCSqGSIb3DQEBAQUAA4GNADCBiQKBgQDx2zIlneFcE2skbzXjq5GudbHNntCGNN9A2RZGC/trRpTXzT/+oymxCytrEsmrwtvKdbTnkkWOxSEUcwU2cffGeaMxgZpONCu+qf5prxZCTMZcHm9p2CwCgFx3
    reSF+ZmoaOvvgVL5TKTzYZK7jRktQxPdTvk3/yj71NQqBGatLQIDAQAB;" 

    you can pick a split point where each part is less than 255 characters long and put [double quote][space][double quote] 

    for example I tried:

    "v=DKIM1; k=rsa; g=*; s=email; h=sha1; t=s; p=MIGfMA0GCSqGSIb3DQEBAQUAA4GNADCBiQKBgQDx2zIlneFcE2skbzXjq5GudbHNntCGNN9A2RZGC/trRpTXzT/+oymxCytrEsmrwtvKdbTnkkWOxSEUcwU2cffGeaMxgZpONCu+qf5prxZCT" "MZcHm9p2CwCgFx3reSF+ZmoaOvvgVL5TKTzYZK7jRktQxPdTvk3/yj71NQqBGatLQIDAQAB;"

    and as a result I’ve got:

    dig -t TXT long.xxxxxx.yyyy @ns-iiii.awsdns-jj.org.
    ;; ANSWER SECTION:
    long.xxxxxxx.yyyy. 300    IN      TXT     "v=DKIM1\; k=rsa\; g=*\; s=email\; h=sha1\; t=s\; p=MIGfMA0GCSqGSIb3DQEBAQUAA4GNADCBiQKBgQDx2zIlneFcE2skbzXjq5GudbHNntCGNN9A2RZGC/trRpTXzT/+oymxCytrEsmrwtvKdbTnkkWOxSEUcwU2cffGeaMxgZpONCu+qf5prxZCT" "MZcHm9p2CwCgFx3reSF+ZmoaOvvgVL5TKTzYZK7jRktQxPdTvk3/yj71NQqBGatLQIDAQAB\;"

    Note that returned TXT contains [double quote][space][double quote] , however the RFC above mandates that string to be treated as the same as concatenated one.

    Note that your example does the same too on 128 character boundary

    dig s2048._domainkey.yahoo.com TXT                                                                                                                                      /workspace/stepany-HaasControlAPI-development
    ;; Truncated, retrying in TCP mode.
     
    ; <<>> DiG 9.4.2 <<>> s2048._domainkey.yahoo.com TXT
    ;; global options:  printcmd
    ;; Got answer:
    ;; ->>HEADER<<- opcode: QUERY, status: NOERROR, id: 61356
    ;; flags: qr rd ra; QUERY: 1, ANSWER: 1, AUTHORITY: 5, ADDITIONAL: 5
     
    ;; QUESTION SECTION:
    ;s2048._domainkey.yahoo.com.    IN      TXT
     
    ;; ANSWER SECTION:
    s2048._domainkey.yahoo.com. 61881 IN    TXT     "k=rsa\; t=y\; p=MIIBIjANBgkqhkiG9w0BAQEFAAOCAQ8AMIIBCgKCAQEAuoWufgbWw58MczUGbMv176RaxdZGOMkQmn8OOJ/HGoQ6dalSMWiLaj8IMcHC1cubJx2gz" "iAPQHVPtFYayyLA4ayJUSNk10/uqfByiU8qiPCE4JSFrpxflhMIKV4bt+g1uHw7wLzguCf4YAoR6XxUKRsAoHuoF7M+v6bMZ/X1G+viWHkBl4UfgJQ6O8F1ckKKoZ5K" "qUkJH5pDaqbgs+F3PpyiAUQfB6EEzOA1KMPRWJGpzgPtKoukDcQuKUw9GAul7kSIyEcizqrbaUKNLGAmz0elkqRnzIsVpz6jdT1/YV5Ri6YUOQ5sN5bqNzZ8TxoQlkb" "VRy6eKOjUnoSSTmSAhwIDAQAB\; n=A 2048 bit key\;"

  • Limit Elasticsearch Memory Use (Heap Size)

    Add the following to /etc/elasticsearch/jvm.options.d/custom.options:

    -Xms2g
    -Xmx2g

    According to official documentation you should avoid adding custom options directly in jvm.options.

  • Receive a User’s UPN, Email, First and Last Name via Azure Active Directory Custom Manifest

    In May 2019 Microsoft has made the new and improved App Registration portal generally available. For some time this new portal has been available under the Azure Active Directory > App registration (preview) menu in the Azure Portal. The old App Registration is still available under Azure Active Directory > App registration (legacy) but most likely it will be discontinued soon.

    The ID token does no longer by default contains fields such as user principal name (UPN), email, first and last name, most likely to ensure that personal data is handled with more consideration. As a result, you must manually update the app registration’s manifest to ensure that ID tokens include the UPN, email, first and last name by adding these optional claims.

    1. Go to Azure Portal > Azure Active Directory > App registrations
    2. Find your application registration (you may click on the All applications tab)
    3. Click Manifest
    4. Update the Manifest and change the optionalClaims node as shown below
    "optionalClaims": {
    	"idToken": [{
    			"name": "family_name",
    			"source": null,
    			"essential": false,
    			"additionalProperties": []
    		}, {
    			"name": "given_name",
    			"source": null,
    			"essential": false,
    			"additionalProperties": []
    		}, {
    			"name": "upn",
    			"source": null,
    			"essential": false,
    			"additionalProperties": []
    		}, {
    			"name": "email",
    			"source": null,
    			"essential": false,
    			"additionalProperties": []
    		}
    	],
    	"accessToken": [],
    	"saml2Token": []
    },